I have been sharing recipes in one way or another since about 2005. I started off on AOL Journals. I had a page called Marie's Muses. It didn't take long for me to recognize that people loved it when I shared a recipe. I was working as a Chef at the time and was always cooking and always had something tasty to share.
AOL Journals then became defunct and so I moved over to Blogger and had a blog called A Year From Oak Cottage. I lived in a Cottage on the Manor Estate where I worked as a Chef, called Oak Cottage. Again, I shared recipes.
After I left there I changed the name to And Then We All Had Tea. Oak Cottage didn't seem to fit any more as I no longer lived there.
I was thinking today what I should do with all the recipes I shared there. They are all great recipes, although the photography is not that good. I decided I will move some of them here from time to time, and hope that people get some enjoyment out of them, despite the really poor photography.
Sweet Corn Chowder. This is a recipe I often made when my children were growing up. It was hearty and simple and economical. It also made a quick and easy meal to throw together after church on Sundays when we arrived home starving and I wanted to put something on the table pronto!
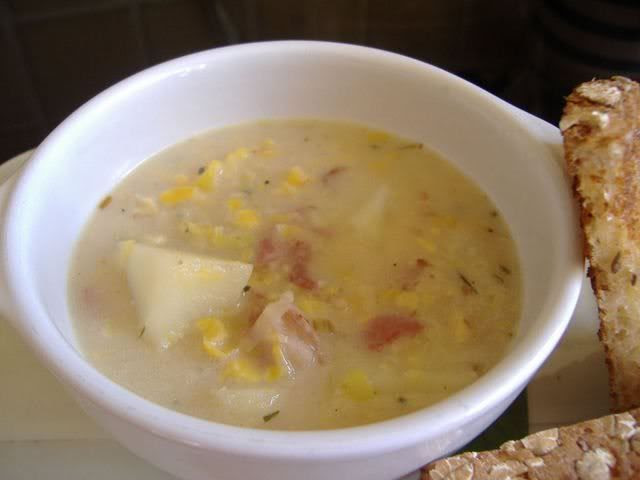
Sweet Corn Chowder
Yield: 4
Prep time: 10 MinCook time: 20 MinTotal time: 30 Min
This has always been a real family favorite in my home. It's very quickly put together and uses things that I have in my store cupboard all the time. You can have a delicious, satisfying and rib sticking meal on the table in about half an hour, give or take a few.
Ingredients
- 4 slices smoked rindless streaky bacon
- ½ leek, cut in half lengthwise and then thinly sliced into half moons
- 2 large floury potatoes, peeled and cut into 1 inch chunks
- boiling water or stock
- 1 bay leaf
- ½ tsp summer savory or thyme
- Salt and pepper to taste
- 1 14 1/2 ounce(425g) tin creamed style corn
- 2 cups whole full fat milk
- 1 lump butter (about 2 TBS)
Instructions
- Heat a heavy bottomed medium large saucepan over medium heat and toss in the bacon. Fry until crisp.
- Add the slices of leek and cook for a few minutes longer until tender.
- Add the potatoes, bay leaf, herbs and boiling water to cover. Bring back to the boil, then reduce the heat and simmer for 10 minutes or until the potatoes are tender.
- Stir in the creamed corn and the milk. Gently heat until heated through without boiling.
- Season to taste with the salt and pepper. Add a lump of butter and serve hot with buttered crispy whole grain toast or crackers.

Portuguese Gumdrop Cake. I have no idea why this is called what it is called. That is the name it was given I guess and it stands. This is a fabulous Gumdrop Cake recipe. I got the recipe from my sister many, many years ago. It is the cake we always made for Christmas and we all love it.
My mother was making it one time and a piece of her rubber spatula broke off into the batter. She never did find it. We were very tempted to rename it rubber spatula cake, but somehow that didn't sound near as appealing as Gumdrop Cake!

Portuguese Gum Drop Cake
Yield: Makes one Bundt cake or 16 servings
Prep time: 15 MinCook time: 2 HourInactive time: 15 MinTotal time: 2 H & 30 M
This cake is moist, delicious and chock full of wonderful sweet gumdrops. Everyone loves this! It also freezes very well.
Ingredients
- 1 cup (225g) butter
- 1 1/2 cup (300g) caster sugar
- 3 large free range eggs, separated
- 3 cups (40g)plain flour
- 2 tsp baking powder
- generous pinch of salt
- 1 cup (240ml)whole milk
- 1 tsp lemon essence
- 1/2 tsp vanilla extract
- 1/2 cup (75g) sultana raisins
- 1 cup candy gum drops, cut in half (save the black ones for eating)
Instructions
- Pre-heat the oven to 150*C/300*F. Grease and flour a tube pan (I use my fluted Bundt pan) and set it aside.
- Cream together the butter and the sugar until light and fluffy. Beat in the egg yolks, mixing them in well.
- Sift together the flour, baking powder and salt. Stir together the milk and the vanilla essence. Beat the egg whites until stiff.
- Add the flour mixture to the creamed mixture, alternating with the milk, beginning and ending with dry. Mix it all in well. Fold in the beaten egg whites. Try hard not to over mix the batter and deflate the whites. Carefully fold in the gumdrops and the raisins.
- Pour the batter into the prepared pan and bake in the pre-heated oven for 1 1/2 to 2 hours or until it springs back when lightly touched and a toothpick inserted in the center comes out clean. If it is browning too quickly on top, cover with some aluminum foil.
- Remove from the oven and let cool in the pan for at least 15 minutes before you remove it to a wire rack to cool completely. You may dust the top with icing sugar before serving.
Cauliflower Cheese Pie - This is a lovely Vegetarian option. It does take quite a while to bake, but it is worth all of the effort taken. With its crisp potato crust and rich cauliflower cheese filling, even the most ardent meat eater will enjoy this! I guarantee!

Cauliflower Cheese Pie
Yield: 6
Prep time: 20 MinCook time: 1 H & 35 MTotal time: 1 H & 55 M
This delicious vegetarian entree is very easy to put together and uses things that most people have in their larder and fridges. The grated potato crust is fabulous and I can imagine using it for all sorts of entrees. If you love cauliflower cheese, this pie is for you!
Ingredients
For the crust:
- 2 cups (400g) packed grated raw potatoes
- 1/2 teaspoon salt
- 1 large free range egg, beaten
- 1 small onion, peeled and grated on a box grater
For the filling:
- 1 cup grated (120g) strong cheddar cheese
- 1 medium head of cauliflower, broken into small florets
- 1 garlic clove, Peeled and crushed
- 1 medium onion, peeled and chopped
- 3 tablespoons butter
- 1/4 tsp dried thyme leaves, rubbed between your fingers
- 1/2 teaspoon dried basil
- 1/2 teaspoon salt
- 2 large free range eggs
- 1/4 cup (60ml) whole milk
- freshly ground black pepper to taste
- paprika to dust on top
Instructions
- Pre-heat the oven to 200*C/400*F. Oil a 9 inch pie tin and set aside.
- Set the freshly grated potato in a colander over a bowl. Salt it and leave for 10 minutes. Then, squeeze out the excess water. Beat in the egg, salt and grated onion.
- Pat into the prepared pie tin, building up the sides of the crust with lightly floured fingers. Bake in the heated oven for 40 to 45 minutes, until browned. After the first 30 minutes, brush with some more oil to help it get really crisp.
- Meanwhile saute the onions and garlic in the butter until soft without browning, for about 5 minutes. Add the herbs and cauliflower and cook, covered, 10 minutes longer, stirring occasionally. Season to taste with salt and the pepper.
- Spread half the cheese into the baked crust. Top with the sauteed vegetables, then the rest of the cheese. Beat together the egg and milk and carefully pour over. Dust with paprika.
- Lower the oven temperature to 180*C/375*F and bake for 35 to 40 minutes longer, until custard is set and is pie is nicely browned.
- Remove from the oven and let sit for a few minutes before cutting into slices to serve. I like to serve this with a leafy tossed salad.

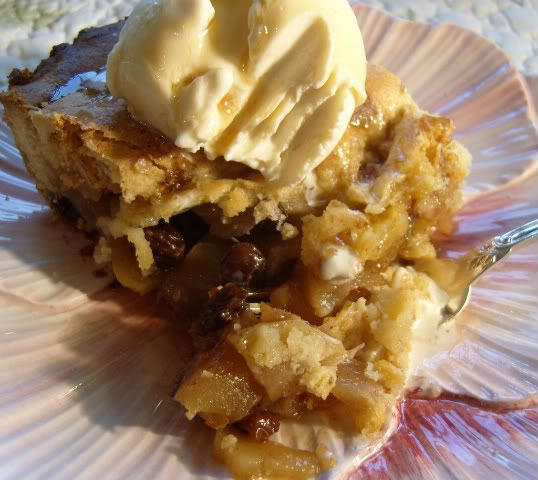
Grandmother's Apple Pie Cake
Yield: 8
You may want to use a mix of apples for this fabulous dessert. I would use a mix of cooking and eating.
Ingredients
For the Dough:
- 1 cup (225g) unsalted butter, at room temperature
- 1 cup (200g)sugar
- 2 large free range eggs
- 1 tablespoon baking powder
- 1/2 teaspoon salt
- Juice of 1 lemon
- 3 1/4 - 3 1/2 cups ( 455g - 490g) all-purpose flour
For the filling:
- 10 medium apples, all one kind or a mix (I like to use Fuji, Golden Delicious and Ida Reds; my grandmother probably used dry baking apples like Cortland and Rome)
- Squirt of fresh lemon juice
- 1 cup (150g) raisins (dark or golden)
- 1/4 cup (50g) sugar
- 1 1/4 teaspoons ground cinnamon
- coarse sugar for sprinkling on top
Instructions
- First make the dough. Working with a stand mixer, preferably fitted with a paddle attachment, or with a hand mixer in a large bowl, beat the butter and sugar together on medium speed until smooth, about 2 minutes.
- Add the eggs and continue to beat until the mixture is light and fluffy, about 3 minutes more. Reduce the mixer speed to low, add the baking powder and salt and mix just to combine.
- Add the lemon juice - the dough will probably curdle, but don't worry about it. Still working on low speed, slowly but steadily add 3 1/4 cups of the flour, mixing to incorporate it and scraping down the bowl as needed. The dough is meant to be soft, but if you think it looks more like a batter than a dough at this point, add the extra 1/4 cup flour. (The dough usually needs the extra flour.) When properly combined, the dough should almost clean the sides of the bowl.
- Turn the dough out onto a work surface, gather it into a ball and divide it in half. Shape each half into a rectangle. Wrap the dough in plastic wrap and refrigerate for at least 2 hours, or for up to 3 days. (The dough can be wrapped airtight and frozen for up to 2 months; defrost overnight in the refrigerator.)
- Peel and core the apples for the filling, and cut into slices about 1/4 inch thick; cut the slices in half crosswise if you want. Toss the slices in a bowl with a little lemon juice and add the raisins.
- Mix the sugar and cinnamon together, sprinkle over the apples and stir to coat evenly. Taste an apple and add more sugar, cinnamon, and/or lemon juice if you like.
- Preheat the oven to 375* F/190*C. Generously butter a 9x12-inch baking pan (Pyrex is good) and place it on a baking sheet lined with parchment.
- Remove the dough from the fridge. If it is too hard to roll and it cracks, either let it sit at room temperature for about 15 minutes or give it a few bashes with your rolling pin to get it moving. Once it's a little more malleable, you've got a few choices. You can roll it on a well-floured work surface or roll it between sheets of plastic wrap or wax paper. You can even press or roll out pieces of the dough and patch them together in the pan - because of the baking powder in the dough, it will puff and self-heal under the oven's heat. Roll the dough out until it is just a little larger all around than your pan and about 1/4 inch thick. You don't want the dough to be too thin, because you really want to taste it. Transfer the dough to the pan. If the dough comes up the sides of the pan, that's fine; if it doesn't that's fine too.
- Give the apples another toss in the bowl, then turn them into the pan. Using your hands, spread them evenly across the bottom.
- Roll out the second piece of dough and position it over the apples. Cut the dough so you've got a 1/4 to 1/2 inch overhang and tuck the excess into the sides of the pan, as though you were making a bed. (If you don't have that much overhang, just press what you've got against the sides of the pan.)
- Brush the top of the dough lightly with water and sprinkle sugar over the dough. Using a small sharp knife, cut 6 to 8 evenly spaced slits in the dough.
- Bake for 65 to 80 minutes, or until the dough is a nice golden brown and the juices from the apples are bubbling up through the slits. Transfer the baking pan to a cooling rack and cool to just warm or to room temperature. You'll be tempted to taste it sooner, but it does need a little time to rest and settle.
Caramel Squares
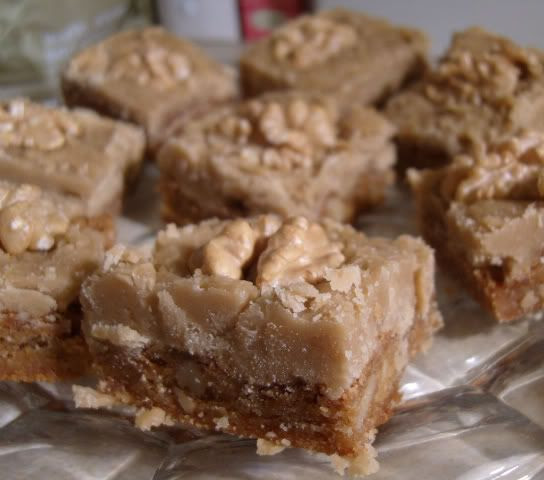
Yield: one (8-inch) square pan
Prep time: 10 MinCook time: 40 MinTotal time: 50 Min
These are butter, rich and very sweet, with a delicious caramel-like flavour. You don't have to add the nuts if you don't want to but we are real nut lovers in this house so I always do. It's crowning glory is the delicious brown sugar fudge icing on top. These are winners on all counts!
Ingredients
For the squares:
- 1/2 cup (120g) butter
- 1 cup (200g) soft light brown sugar, packed
- 1 large free range egg
- 1 tsp vanilla
- 1 cup (140g) plain flour
- 1 tsp baking powder
- 1/2 tsp salt
- 1 cup (115g) coarsely chopped walnuts (Optional)
For the icing and to finish:
- 10 TBS soft light brown sugar(packed)
- 3 TBS butter
- 2 TBS cream
- 1 cup (130g) icing sugar, sifted
- 1 tsp vanilla
Instructions
- Pre-heat the oven to 180*C/350*F. Lightly butter an 8 inch square baking pan and line it with some baking paper. Lightly butter the paper and then set it aside.
- Put the butter and the brown sugar into a heavy bottomed saucepan over medium heat on top of the stove. Cook, stirring, until well melted and smooth. Remove from the stove and let cool for a few minutes.
- Beat the egg and vanilla together and add a bit of the warm caramel mixture to temper it, then carefully stir it back into the full mixture. Beat well.
- Sift the flour, salt and baking powder together and stir this into the egg/caramel mixture, mixing it in well. Stir in the walnuts if using.
- Pour the batter into the prepared pan, smoothing it out evenly and then bake it for 25 to 30 minutes. When done it should have a shiny surface quite similar to brownies and be cooked through, but still moist and somewhat fudgy.
- Remove from the oven and let cool while you make the frosting. Frost with the fudge icing while still warm and garnish the top evenly with walnuts so that each square that you cut will have a toasted walnut on top.
- To make the frosting, heat the brown sugar, butter and milk very slowly in a heavy bottomed pan, over medium low heat until the sugar is dissolved. (It should not feel gritty when you rub it against the side of the saucepan with the back of your spoon.)
- Cook over medium low heat until the mixture comes to a full boil. Allow to boil for one minute only.
- Remove from the heat and stir in the vanilla and the icing sugar until it is smooth. Immediately pour over your cake or squares.

Rarebit Risotto
Yield: 4
Prep time: 10 MinCook time: 35 MinTotal time: 45 Min
Now I know that things like cheddar cheese and beer are not usual ingredients when one thinks of making an Italian Risotto, but try it . . . this is one tasty risotto! I like to sprinkle more cheese on top to serve.
Ingredients
- 4 cups (946ml( of vegetable broth
- 1 TBS olive oil
- 1 1/2 cups (316g) of Italian Arborio rice
- 1 1/2 cups (360ml) of beer
- 3 cups chopped broccoli, steamed until crispy tender, drained well and set aside
- 1 TBS Dijon mustard
- 10 ounces (2 1/3 cups/284g) of grated sharp cheddar cheese
- 2 cups of chopped tomatoes, or halved cherry tomatoes
- freshly ground black pepper to taste
Instructions
- Put the vegetable broth into a large saucepan and bring it to the boil. Reduce the heat and leave it to simmer.
- Warm the olive oil in a large, heavy saucepan over medium high heat. Add the rice and stir, cooking until it is well coated with the oil.
- Add the beer and cook, stirring until the rice has absorbed all of the liquid which will take a couple of minutes.
- Continue to cook, ladling in the simmering broth one cup at a time, stirring frequently. Let the rice absorb most of the broth before adding the next cup. This generally will take about five minutes at a time. When the last of the broth is absorbed the rice should be al dente and the risotto moist.
- Stir in the Dijon mustard and the cheese, stirring until the cheese is completely melted. Fold in the broccoli and the chopped tomatoes. Season to taste with the black pepper and serve.
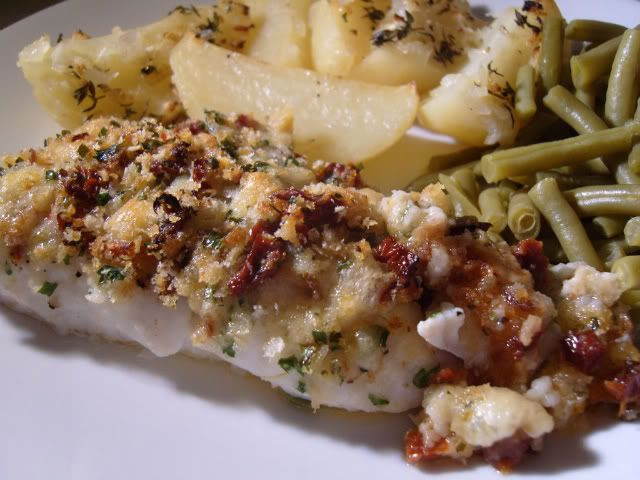
Tomato Herb Crusted Haddock
Yield: 2
Prep time: 10 MinCook time: 20 MinTotal time: 30 Min
Haddock is such a mild and sweet fish. It is one of my favorite types. Cheese and tomatoes go very well with it. Just be careful not to overcook your fish. It should just barely flake beneath the tines of your fork and still be moist. You can have this lovely meal on your table in less than half an hour depending on what you serve it with.
Ingredients
- 2 thickish haddock filets, about 4 ounces each
- 1 slice of bread, crumbed into soft crumbs (I use my blender for this)
- 1/2 cup (56g) of cheddar cheese, finely grated
- 2 TBS finely chopped flat leaf parsley
- 4 sundried tomatoes in oil, drained and finely chopped
- sea salt and freshly ground black pepper
- a drizzle of olive oil
Instructions
- Pre-heat your oven to 200*C/400*F. Lightly butter a shallow gratin dish.
- Wipe your haddock fillets and place them, right side up in the prepared dish. Season with some salt and pepper.
- Place the bread crumbs, cheese, parsley and sun dried tomatoes in a small bowl and toss them together until they are well combined. Divide them between the two fish filets, piling it lightly on top of each. Drizzle with a bit of olive oil and then bang them into the pre-heated oven.
- Bake for 15 to 20 minutes, or until they are lightly browned and you can gently flake the fish with the tines of a fork. Remove from the oven and serve. I like to serve them with some oven roasted Greek potatoes and some lightly steamed green beans on the side.
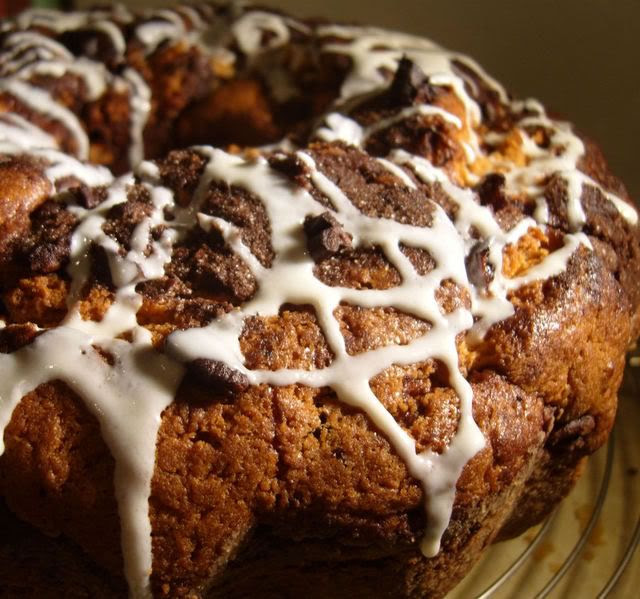
French Coffee Cake
Yield: 12 to 16
Prep time: 15 MinCook time: 45 MinInactive time: 15 MinTotal time: 1 H & 15 M
This coffee cake is impressive and delicious and very easy to make. I am not sure exactly why it is called French. I have never actually seen it on any of the trips I have made to France. I suppose some soul thought years ago that the name made it sound exotic and inviting and like a foreign treat. The smell alone when it's baking is inviting enough for me!
Ingredients
For the cake:
- 1/2 cup (120g) butter, softened
- 1/2 cup (110g)vegetable shortening (Trex, Crisco, White flora)
- 1 cup (200g) caster sugar
- 3 large free range eggs
- 3 cups (420g) all purpose plain flour
- 1 TBS baking powder
- 1 tsp baking soda
- 1/2 tsp salt
- 1 cup (120g) sour cream
- 1 tsp almond extract
- 1 tsp pure vanilla extract
For the streusel:
- 1/4 cup (35g) cocoa powder
- 1/2 cup (50g) caster sugar
- 1/2 cup (60g) chopped pecans
For the glaze:
- 1 cup (130g) icing sugar
- a few drops of milk to thin
Instructions
- Pre-heat the oven to 180*C/350*F. Lightly grease and flour a tube or bundt cake pan. Set aside.
- Cream the butter and shortening together until fluffy. Beat in the sugar and then the eggs, one at a time, beating well after each addition.
- Sift together the flour, baking powder, baking soda and salt. Mix together the sour cream, almond extract and the vanilla. Add the flour mixture to the creamed mixture, alternately with the sour cream mixture.
- Combine the streusel ingredients, mixing then together well.
- Pour half the batter into the prepared cake pan. Sprinkle with half the streusel mixture. Pour on the remaining batter and then finally top with the remaining streusel. Run a knife through the batter just once for a marble effect.
- Bake for 1 hour, until a toothpick inserted in the centre comes out clean. (start checking after 45 minutes though, just to be safe)
- Remove from the oven and let sit for 15 minutes before removing from the pan to a wire rack to finish cooling.
- Place on a plate top side up (streusel side). Make the glaze by stirring the icing sugar together with enough milk to make a thin mixture which will drizzle well. Drizzle it haphazardly over the top of the cake. Cut into thick slices and serve with your favourite hot bevvie!

Chicken Stuffed with Goat's Cheese & Herbs
Yield: 4
Prep time: 15 MinCook time: 30 MinTotal time: 45 Min
If you don't like goat's cheese you can use cream cheese instead, but I happen to like the slight tang of the goats cheese. It goes very well with the herbs and helps to keep the chicken moist.
Ingredients
- 4 boneless, skinless chicken breast portions (I like to use free range organic)
- 4 TBS soft goat's cheese
- 2 TBS snipped fresh chives
- 1 TBS finely chopped flat leaf parsley
- 1 TBS finely chopped fresh basil
- 4 sun dried tomato halves, drained well, and finely chopped
- 1 small clove of garlic, peeled and finely chopped
- salt and black pepper to taste
- 8 slices of pancetta
- Tomato Vinegar to drizzle(optional)
Instructions
- Pre-heat the oven to 180*C/350*F.
- Take your chicken breasts and wipe them dry. Taking a very sharp knife cut them in half through the center almost all the way through, but leaving them joined all along one edge, so that you can open them up like a book. Sprinkle the inside of each with a bit of salt and black pepper.
- Put the goat's cheese into a small bowl. Add the herbs, the garlic and the sundried tomatoes. Mix well. Divide the goat's cheese mixture evenly amongst the four breasts, mounding it up slightly in the center and then fold the chicken meat over top to cover it completely. Wrap each breast in two slices of the pancetta to cover, and then place them onto a shallow baking tray, leaving a bit of room around each.
- Bake in the pre-heated oven for 25 to 30 minutes, until the pancetta is nicely browned and the chicken is cooked through. Remove from the oven and let sit for a few minutes.
- Serve each breast on a heated plate, cut through and fanned out and drizzled with a bit of tomato vinegar if desired. Delicious! A nice cheese risotto goes very well with this.
Notes
If you cannot get tomato vinegar you might want to drizzle it with a balsamic vinaigrette.
This content (written and photography) is the sole property of The English Kitchen. Any reposting or misuse is not permitted. If you are reading this elsewhere, please know that it is stolen content and you may report it to me at: mariealicejoan at aol dot com
Thanks so much for visiting. Do come again!


I don't think I followed you when you were Oak Cottage Kitchen but I know that I have recipes printed out that say "from Oak Cottage Kitchen" that I got here in past years. I'm pretty sure I recently used one of them, at least I saw it when I was sorting through printouts. Those caramel squares look to die for and I know who I'm going to make them for, for their birthday! I have a friend who is a caramel junkie. Maybe she'll share one with me!
ReplyDelete