Tahiti is not a place I have ever travelled to, although we have entertained many LDS Tahitian Missionaries in our home through the years. Tahiti is the largest of the French Polynesian Islands in the central part of the Pacific.
I have to say in all honesty, I haven't actually had any desire to visit any of the Pacific Islands, not even Hawaii. I am more of a European holiday fancier. I've never been interested in travelling any further East than Austria.
I do love food however, and enjoy foods from many cultures and nations. I do love Asian flavours of all kinds. Chinese, Japanese, Indian, Polynesian. Its all yum.
I am just not a fan of hot and humid. It must be because of my cold Canadian blood!
The recipe I am sharing with you today for these Tahitian Coconut Breakfast Rolls is a non-fried interpretation of the Tahitian donuts called Firi Firi!
Firi Firi are Tahitian Coconut Donuts shaped like figure eights, deep fried, rolled in sugar and traditionally eaten for breakfast. They do sound very yummy.
I adapted this recipe from one I found in a Taste of Home Magazine. It purports to be a healthier version of the deep fried donuts, and is a yeast roll, rather than a donut.
But they are filled with lots of coconut flavours, from the coconut milk in the sponge to the shredded coconut which is also used.
The dough itself was very easy to make. I used my Kitchen Aid mixer. My Kitchen Aid was a gift from Jen and I have to say it is really being well utilized these days!
I really love it. Its the star of my kitchen for sure! I have been making beautiful bread and rolls with it, and cakes too. Its an incredible piece of kit!
Last winter I bought the meat grinder attachment for it when my sister and I wanted to make ground pork for our Christmas Meat Pies. We could not find ground pork anywhere, so I said to her, lets make our own.
Since then I have also been grinding my own steak, etc. Nobody could have given me a nicer gift than my kitchen aid. It has been very much appreciated. Now back to the bread.
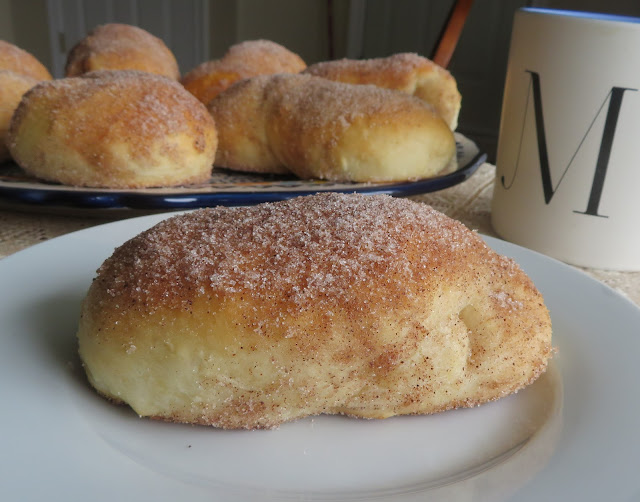
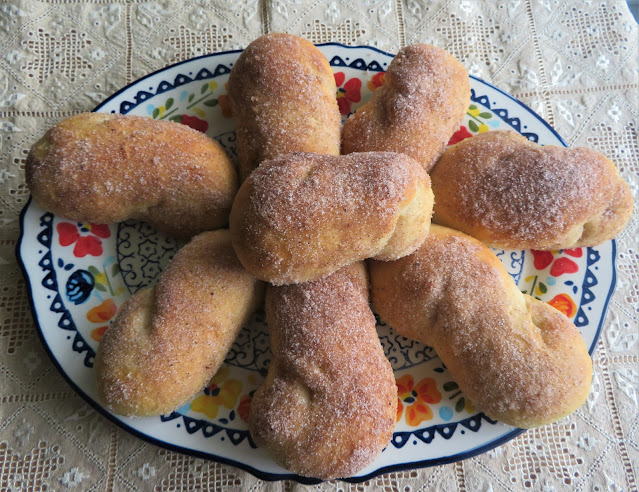
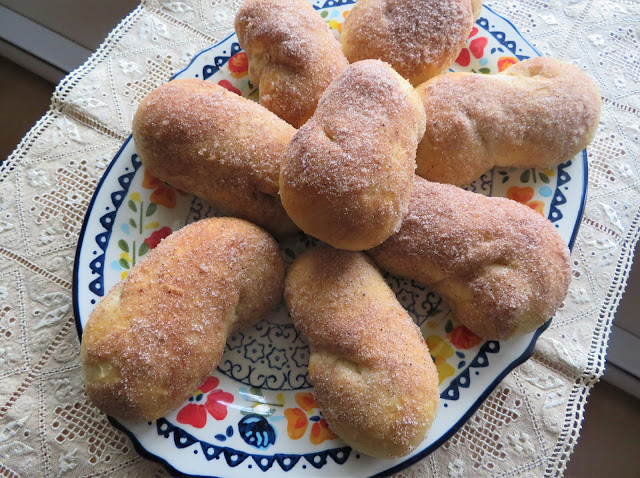
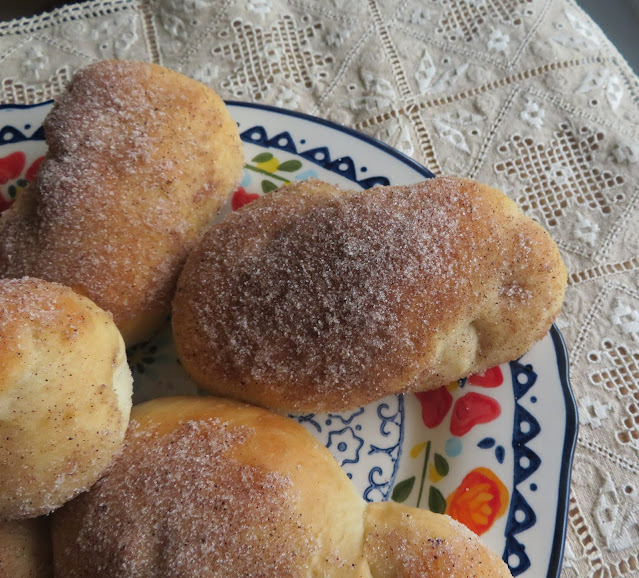
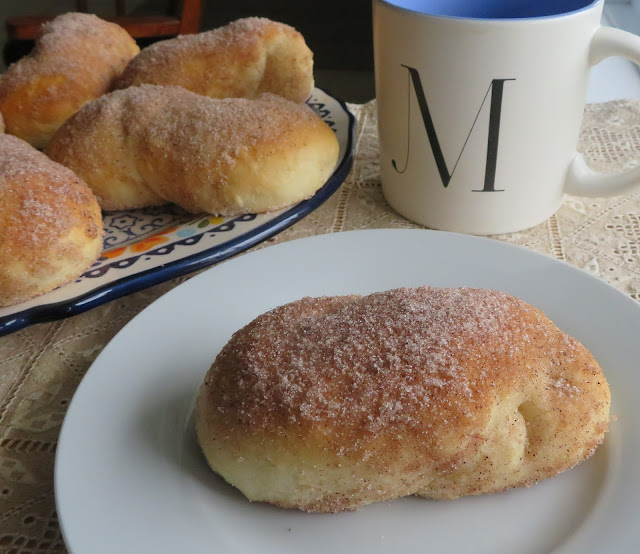
The most difficult part of making these rolls was shaping them into figure eights. I did not do so good at that as you can see.
The dough went onto my baking sheet looking like figure eights, but when it rose, any resemblance to a figure eight disappeared!
This is as close to a figure eight as I got! haha Not very eightish, but a rose by any other name and all that, they still taste fabulous!
The dough it made rich and sweet from the use of coconut milk. You will not need the full can, but you can freeze what you don't use today to use in another recipe in the future.
Every time I open a can of coconut milk, it is separated. I have coconut solids at the top and then clear liquid at the bottom. I just remove it all to a jug and whip it back together with a small wire whisk.
Easy peasy. I used full fat coconut milk.
You also need shredded sweetened coconut for these rolls. Not flaked, or long shred. Just shredded.
I dare say you could also use sweetened desiccated coconut. What you don't want is long shreds or flakes.
The appeal of these buns is the coconut flavors and their beautiful texture. Once baked you brush them with melted butter and roll them in a sweet spiced sugar.
Spiced with cinnamon, ginger and vanilla. You will need a vanilla bean for this. You just cut it in half and scrap out the seeds, mixing it together with the sugar and other spices.
The sugar itself sure smells nice. You will have a bit extra. Why not save it to use for cinnamon toast, or better yet, double the quantities and you have it to use whenever.
I love cinnamon toast. When we were children if we ran out of breakfast cereal, my mother would make us bread and butter with cinnamon on it, sometimes with some milk poured over top.
A favorite dessert was also jello with sugar and milk on it. Its a wonder we had any teeth left in our heads!
In any case these were lovely with a nice mug of hot chocolate and I think they would also go very well with a frothy cup of milky coffee or tea.
Served warm as is, or with some butter and jam. I don't think it could get much better than this!
Tahitian Coconut Breakfast Rolls
Yield: Makes 8 rolls
Author: Marie Rayner
Prep time: 35 MinCook time: 15 Mininactive time: 2 HourTotal time: 2 H & 50 M
A popular Tahitian breakfast treat, normally fried, but baked in this healthier version. They are delicious!
Ingredients
- 1 package active dry yeast
- 1/4 cup (60ml)warm water
- 1/2 cup (120ml) full fat coconut milk, warmed
- 1/2 cup (35g) shredded sweetened coconut
- 1/3 cup (57g) granulated sugar
- 1/2 tsp salt
- 2 to 2 1/2 cups (280g to 400g) strong bread flour
Spiced sugar:
- 1/2 cup (95g) granulated sugar
- 1 tsp ground cinnamon
- 1/2 tsp ground ginger
- 1/2 vanilla bean
- 1/4 cup (60g) butter, melted
Instructions
- Stir the yeast into the warm water. Leave to bubble for 5 to 7 minutes. Stir to dissolve. Add to the warm coconut milk.
- Combine the coconut, sugar, salt, yeast mixture and 1 cup (140g) of flour together in the bowl of your stand mixer. Stir on medium speed until smooth. Add enough of the remaining flour to make a stiff dough. Knead for 6 to 8 minutes. Tip out onto a lightly floured surface. Knead a few times (dough will be sticky), and then pop into a buttered bowl, turning to grease the dough. Cover with plastic cling film and set aside in a warm place to rise until double, about 1 1/2 hours.
- Tip the risen dough out onto a lightly floured surface and knock it back. Divide into 8 equal pieces. Shape each piece into a 12 inch long rope. Curl ends in opposite directions to make a figure 8. Tuck each end underneath and pinch together. Place onto a large baking sheet which you have lined with baking parchment.
- Repeat until you have shaped all the rolls. Cover lightly and set aside to rise for a further half an hour.
- Preheat the oven to 375*F/190*C/ gas mark 5.
- Bake the rolls in the preheated oven for 12 to 15 minutes until risen and light golden brown.
- While they are baking whisk the sugar, ginger, cinnamon and seeds from the vanilla pod together.
- Let the rolls cool for a few minutes. Then brush the tops of each roll (one at a time) and roll in the cinnamon sugar to coat. Let cool on a wire rack. Serve warm or at room temperature.
Did you make this recipe?
Tag @marierayner5530 on instagram and hashtag it #TheEnglishKitchen
I am a huge fan of curried chicken. One of the first things I learned to cook when I was going to college to become a chef was Chicken Tikka.
That dish was quite different than this creamy curry dish that I am sharing with you here today. It was a dry curry, in that the chicken was rubbed with all these spices and yogurt and then grilled in the oven on top of a bed of onions.
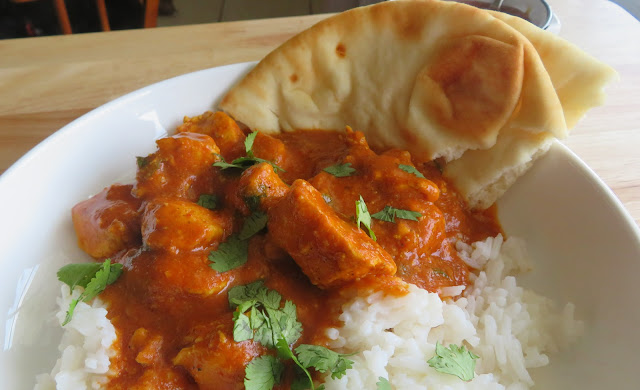
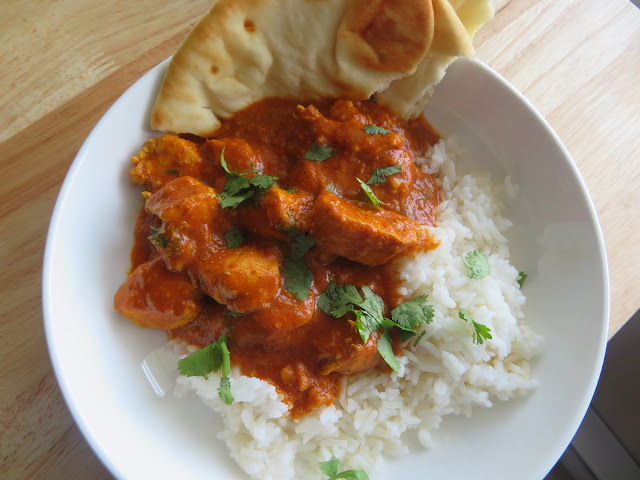
Chicken Tikka Masala however, is a creamy curry, not a dry curry. It has a lush creamy sauce, that is rich in spice and tomato flavors. It is the tomato that gives it that lovely reddish hue.
This particular recipe is one that I have adapted from the half baked harvest tikka masala recipe in her book Half Baked Harvest, Super Simple.
I have both of the Half Baked Harvest Cookbooks and I have to say I just love them. Teighan Gerrard is a master at combining flavors and at presentation. She cooks beautiful food that tastes good.
I have been a huge fan of curry for many, many years, having first tasted it back in the early 1980's. It was not something which I grew up with. My parents had very simple tastes, there was nothing out of the ordinary included in our diets.
I had to move away from home and go out into the world before I could taste the world. I have been tasting the world ever since! I am a lover of all kinds of foods and cultures, one of which is curry.
I have not actually been to India myself, but my brother has many times. On his recent visit home here to Nova Scotia, I did a Curry Roast Chicken that didn't turn out exactly the way I wanted it to. I would have been far better off cooking him this curry, as simple as it is.
Not that the other one wasn't tasty. It was. It just took twice as long to cook as the recipe had suggested. This recipe has timings that are spot on.
I did take the liberty of cutting the recipe in half for the smaller family, of which I am one. If you are looking for the full sized recipe, I suggest you check it out on Teighan's page. Prepare yourself to fall in love.
One thing I liked about this recipe is that it used simple ingredients. There is nothing too much out of the ordinary. Simple fresh ingredients and spices.
You begin by making a curry paste. Its simply a mix of onion, shallot, garlic, fresh ginger, lemon zest and some spices pulsed together in a blender or food processor until smooth. I took the liberty of adding some light olive oil.
You won't need all of it for this recipe, but never fear. It will keep in the refrigerator for up to a month and it also freezes well.
To freeze it, I drop it onto a wax paper lined baking sheet in heaped tablespoons and freeze. Once hard and frozen solid, I peel it off and drop it into a zip lock baggie. Ready to take out as and when I need it.
Cubed boneless, skinless chicken breast is marinated in a mix of full fat Greek yogurt and some of the curry paste for about half an hour.
Once you have done that, more of the paste is heated in a skillet and then you add the marinated chicken and remaining ingredients.
One reason you use full fat yogurt is so that the sauce doesn't split. It gives you a much nicer finish and richer flavour.
You also use full fat coconut milk, and for the same reasons. Full fat coconut milk gives you a much richer sauce with a lovely creamy texture.
You don't need a full can, but again, don't worry. You can freeze what you don't use for a further date. Before you use the coconut milk however, do whisk it well together.
In the can it tends to separate so you end up with a watery liquid and coconut solids. Whisking the two together gives you what you are looking for, and what you need.
You also won't need a full tin of tomato paste. This is known as tomato puree in the UK.
Just dollop the bits you don't use onto a wax paper lined baking sheet in tablespoon sized dollops and freeze. Once solid, peel off and pop into a zip lock baggie to use as and when you need tomato paste, be it sauces or whatever.
And not just Indian food. It will come in handy for pizza sauce or marinara sauce, etc. Don't worry, it will get used.
Chicken Tikka Masala is a bit spicier than a regular Chicken Tikka, but having said that the coconut milk helps to calm that down a bit so that it isn't obnoxious in any way. It has a very tolerable heat.
I like to serve my curries with naan bread on the side so that I can sop up all of that delicious sauce. The sauce is part of what I enjoy most about a curry and I don't want to miss out on any of it!
Naan bread is the perfect way to scoop/soak some of it up. There are some really good ready made naan breads available on the market today, or you can make your own if you are keen.
I often make my own and have an excellent recipe here for a no-yeast Naan bread which came in really handy at the beginning of the Covid lockdown when yeast was short.
You can find that easy and delicious recipe here. There is no yeast required and it goes together very quickly. These are so soft, pliable and tasty that you will find you would rather make your own than buy it! Trust me on this.
They also freeze well, individually wrapped and then popped into a large airtight zip lock baggie ready to take out when needed. You can thaw them either in the microwave or the oven.
I prefer the oven myself.
They also make great pizza bases. (just saying) You can find my tasty recipe for Naan Bread Pizza here.
Another must (for me anyways) is a good boiled/steamed rice and some chutney on the side. Today I used Jasmin Rice, but Basmati is also very good. I just like it plain.
I like a good Mango Chutney. In the UK I liked to use Geeta's because it had a lovely flavor. Here I have not found a really good one yet. They have Patak's which is okay. I think I might be tempted to make my own.
I learned how in college, so watch this space. I like a chutney with substance and tasty little bits in it. The Patak's is quite smooth. It tastes alright but I want texture.
In any case, I hope you will want to try out this delicious Chicken Curry. Of course there is only one in my home, me, but I can assure you that none of this went to waste. I enjoyed the leftovers the day after and if anything, it was even more delicious. That's the way it is with things like this. Left to ripen overnight really develops their flavors nicely!!

Coconut Chicken Tikka Masala for Two
Yield: 2-3
Author: Marie Rayner
Prep time: 15 MinCook time: 30 Mininactive time: 30 MinTotal time: 1 H & 15 M
Other than making the curry paste, this has to be one of the quickest and easiest curries I have ever made. Its also incredibly delicious. Served with rice, mango chutney and garlic naan for an incredibly tasty meal! You will not need all of the curry paste, but it freezes well.
Ingredients
For the curry paste:
- 1 medium onion, peeled and quartered
- 1 shallot, peeled and halved
- 6 cloves of garlic, peeled
- 2 (1-inch) pieces of fresh ginger, peeled
- 3 TBS garam masala
- 2 tsp ground turmeric
- 1 1/2 tsp fine sea salt
- 1 tsp crushed red chili flakes
- the zest of one lemon
- 1 TBS light olive oil
You will also need:
- 1 pound of boneless, skinless chicken breast, cut into 1 inch cubes
- 1/4 cup (60g) full fat plain Greek yogurt
- 7 fluid ounces (1/2 can) full fat, unsweetened coconut milk (you can freeze the rest)
- 3 TBS tomato paste (tomato puree)
- 3 TBS chopped fresh coriander
- Steamed rice for serving
- Naan bread for serving
- mango chutney for serving
Instructions
- First make the curry paste. Put all of the ingredients into the basin of a food processor or into a blender. Pulse until the mixture forms a smooth paste.
- Combine 1 heaped TBS of the curry paste in a bowl with the yogurt and chicken pieces. Stir everything together to combine well. Cover and set aside for half an hour.
- Heat a deep skillet over moderate heat. Add 2 heaped TBS of the curry paste and cook, stirring until fragrant. Add the marinated chicken pieces, coconut milk and tomato paste. Bring to the boil, then reduce to a slow simmer.
- Cover and simmer for 15 to 20 minutes, until the chicken is cooked through and the juices are no longer pink. Uncover the curry and cook for a further 5 to 8 minutes at a slow bubble until the sauce thickens.
- Stir in the chopped coriander and serve the chicken immediately, spooned over rice with some garlic naan and mango chutney on the side.
Did you make this recipe?
Tag @marierayner5530 on instagram and hashtag it #TheEnglishKitchen
I picked up a new magazine at Walmart on Friday. Taste of Home, Fall Baking, Homemade Happiness.102 recipes to warm the heart. I admit, I am a sucker for cooking publications. Especially seasonal ones.
This one is filled with the best recipes of Autumn, containing recipes using cranberries, pears, pumpkin, nuts and so much more. Tis the season and all that!
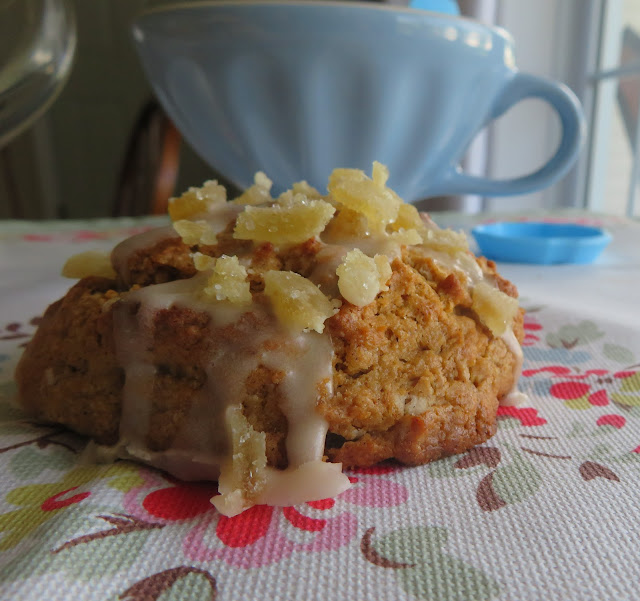
This recipe for Vanilla Glazed Ginger Scones immediately caught my eye. They include three of the things I really love! Vanilla, Ginger and Scones!
What's not to love about that!
The original recipe made a dozen scones. I don't need and could never eat a dozen scones and so I decided to small batch the recipe to make only six delicious scones!
This is the perfect size for just me. It was also a bit different than my usual gingerbread scone recipes. I actually have two other Gingerbread Scone recipes on here, both are very delicious.
This Gingerbread Scone recipe comes from Land O Lakes, and is attributed to the Pioneer Woman. You can find my recipe and results here.
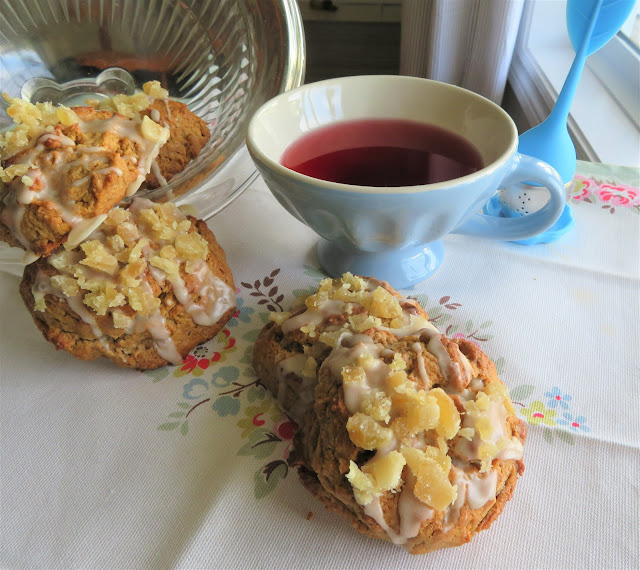
It is a triangular scone with a demerara sugar topping and a vanilla glaze icing.
Then there is my recipe for Gingerbread Scones with a Lemon Glaze. These are filled with optional raising and cut into rounds.
They are glazed with a lemon glaze and garnished with some candied ginger. You can find that recipe here.
Both are excellent recipes I have to say. But, true confessions here, I think this one is slightly better. Now hear me out. This is for several reasons.
One, its the right size for me. Two, they have a beautiful soft texture and tender crumb. Three, they have a beautiful colour. Four, they are slightly quicker and easier to make. I rest my case.
All of the recipes are excellent however, which ever you choose to make, but on this day, I am highly recommending these!
That could be because the house smells magnificent at the moment . . . all gingery, cinnamony and buttery.
Or it could be because I just ate one and the delicious flavors of it are still lingering in my mouth. Tempting me to go and have another one. (I know naughty me.)
These do have a more cake-like consistency than the other two, almost like a Rock Cake. Did you know that Rock Cakes are Harry Potter's favourite teatime treat? You can find my Rock Cake recipe here.
I am not surprised that they are Harry Potter's favorite thing. He has good taste. They are fabulously tasty.
For those who are wondering a Rock Cake is a drop scone. No rolling or faffing about needed. Simple to make and oh so easy.
These are spiced simply. Ground ginger and ground cinnamon. Nothing more, nothing less. Not too much of either one.
They are also flavored and sweetened with brown sugar, molasses and maple syrup. A trinity of good taste.
There is vanilla in the scone itself and in the glaze. I use pure vanilla extract. In the UK I was always being sent lush vanilla things. Vanilla paste, etc. Here I have had to buy my own everything.
I have to say though, I always and will always use pure Vanilla extract and other essences. They are worth the little bit extra you pay. There is no comparison between the real thing and the pretenders.
The candied ginger I bought on Amazon. I bought a large bag of it. A kilo. It will last forever. In things like that I don't mind buying larger bags. A bit of an outlay to begin with, but it pays off in the long run.
I also buy my ground almonds/almond flour on Amazon, also in a bit bag just so you know. (Nothing to do with this recipe, but with thrift alone.) You can freeze them and they will keep for a very long time.
If you are like me and use ground almonds a lot, it is worth it get a bigger bag if you can.
The original recipe said to have the egg at room temperature but that didn't make sense if the cream was cold and the butter was cold. And so I didn't bother bringing it to room temperature and it didn't matter one iota.
That's one thing about baking. Either have everything at room temperature or don't bother. Just my two cents worth.
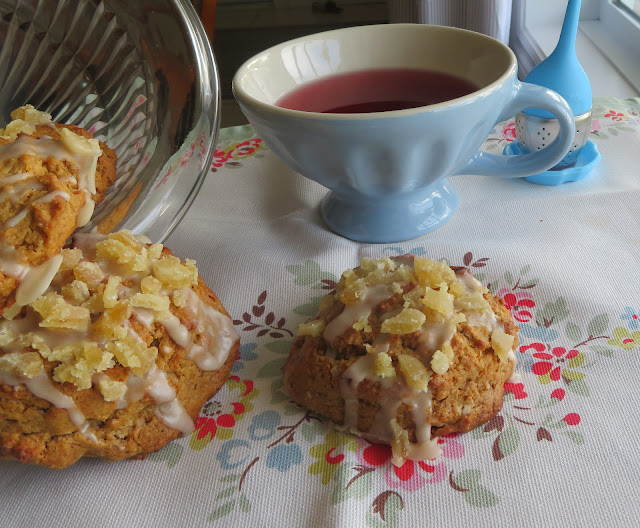
This is a lovely, lovely scone. Perfect for enjoying just as is with a nice hot cup of tea. Today mine was Elderberry Tea that I got from the Tea Haus. Very nice.
I used the batter bowl that my sister gave to me the other day as a prop. Its supposed to look like the scones are kind of overflowing onto the table. haha Just a flight of fancy that worked out so much better in my head. But then again, that's me to a "T."
I am in a bit of a conundrum here. After the end of August feedburner will no longer be sending out e-mails to my subscribers. I have been searching for an e-mail program that people can sign up to. What I have done is add my current subscribers to a list on madmimi. It is an additional cost to me, but I figure it will be worth it in the long run.
I am not sure how to enable people to sign up to receive my newsletters, but will eventually work that out. In the meantime if you are not already an e-mail subscriber, and want to be subscribed just let me know and I will add you to the list! Sort of the convoluted long way of doing things but I will figure it out eventually!
Vanilla Glazed Ginger Scones (small batch)
Yield: Makes 6 scones
Author: Marie Rayner
Prep time: 25 MinCook time: 15 MinTotal time: 40 Min
These tender ginger flavored scones are bound to become a favorite in your home. With lovely warm ginger flavor, a tender crumb, a sweet vanilla glaze and candied ginger garnish, they always go down a real treat with a nice hot drink!
Ingredients
- 1 cup 140g) plain flour
- 1/8th cup (25g) soft light brown sugar
- 1 1/4 tsp baking powder
- 3/4 tsp ground cinnamon
- 1/2 tsp ground ginger
- pinch salt
- 3 TBS cold butter
- 3 fluid ounces heavy whipping cream
- 1 large free range egg yolk
- 1 fluid ounce fancy molasses
- 1/2 TBS maple syrup
For the glaze and finish:
- 1/2 cup (65g) icing sugar, sifted
- 1 fluid ounce of heavy whipping cream
- 1/2 tsp vanilla
- 2 TBS finely chopped candied ginger
Instructions
- Preheat the oven to 400*F/ 200*C/ gas mark 6. Line a baking tray with a sheet of parchment paper. Set aside.
- Measure the flour, sugar, baking powder, cinnamon, ginger and salt into a bowl and give them a good whisk together to combine. Drop in the cold butter and cut or rub it in until the mixture resembles coarse bread crumbs.
- Whisk together the egg yolk, cream, molasses, vanilla and syrup to combine. Add all at once to the dry ingredients and stir everything together just to combine.
- Scoop out by 1/4 cupfuls onto the prepared baking sheet in six even mounds, leaving plenty of space in between each.
- Bake in the preheated oven for 12 to 15 minutes until golden brown on the bottoms and around the edges. They should be set completely on top.
- Remove to a wire rack to cool a bit while you make the glaze.
- Whisk together all of the glaze ingredients until smooth.
- Drizzle the glaze decoratively over top of the warm scones with a spoon and sprinkle with the chopped candied ginger. Serve warm.
Did you make this recipe?
Tag @marierayner5530 on instagram and hashtag it #TheEnglishKitchen
Subscribe to:
Posts (Atom)












Social Icons