Of all the cakes I have baked and eaten through the years my second favorite cake of all time has to be my Spanish Cake recipe. It is so good that I remember once baking it three times in one week.
This is second only to my first favorite which is a Victoria Sponge Cake. I doubt that one will ever be knocked out of its "first place" spot in my life. This Spanish cake is a close second however.
With there just being one of me now however, I doubt that I could, or would want to, eat a whole Spanish Cake. Okay, in all honesty, I could.
It is that delicious. But would I want to? No, it would add a bazillion inches to my already wide girth. And so, since being on my own, I just have never baked it.
Aside from the fact that I have type 2 Diabetes, I just don't need to be eating things like this in huge quantities. But I also can't afford to have people over to eat whenever I decide I want a treat! (Limited income and all that.)
And so today I down-sized my Spanish Cake recipe to make a small delicious cake, perfectly sized for me, myself and I. Also Eileen and Tim (my oldest daughter and her husband) are coming over a bit later so they can help to polish it off.
I am having a bit of a blue day today. Doesn't help that it is raining cats and dogs, so it will be nice to see my girl and her boy.
They always cheer me up. We will play some cards I think and then I will throw something together for our supper., and they can finish off the cake for dessert. I doubt it will be a problem for them!
I have no idea why this is called Spanish Cake. Only that that is its name, and that it is delicious. Its a recipe which I had in my Big Blue Binder for years and years.
So long that I no longer remember where I got it from. But the page is splattered and torn and fading, so you know its a good recipe. Well used.
I love simple butter cakes like this. Simple ingredients, simply put together. Delicious results.
You start by creaming together butter and sugar. You want your butter to be at room temperature, but not melting if you know what I mean. I like to cream it by hand.
That is the way our grandmother's would have done it, by hand, in a ceramic or an enamel bowl with a wooden spoon. In baking creaming is a process whereby you mash/rub together two ingredients (usually sugar and fat) to get a thick, creamy homogenous paste.
This process is what helps the sugar to melt into the batter when making cakes and cookies. You don't want a gritty batter when you are making a cake or a cookie!
If your butter is cold from the fridge, just pop it into the microwave for 10 or 15 seconds. Just don't melt it.
Once you have creamed your sugar and butter together, you can beat in the egg yolk. This smaller version of the cake only takes one egg, and you will need to separate it. I use large free range eggs.
I just use a wooden spoon for that as well. I do confess I use my electric hand mixer to beat the egg white into submission!
Beating egg whites stiff by hand takes forever and I mean that with a capital "F."
FOREVER! I have been there and done that. Your arms get a real workout! Our grandmothers did have hand beaters, that weren't electric, but trust me, even those take a long time! They must have had really big strong muscles!
I like to sift the flour, baking powder and cinnamon together. That way the baking powder gets evenly mixed into the flour. Then it is a matter of beating the flour into the batter alternately with the milk.
You need to start with and end with flour. Not sure why that is, but its the way it usually is with cakes. The egg white gets folded in last.
Folding is a very precise action when it comes to baking and differs a great deal from stirring, or beating for that matter.
In folding you are combining two ingredient with different textures together to make one homogenous batter. In this case, the cake batter itself, which is thick . . .
And the egg whites which are fluffy and light. I usually begin by stirring in about half of the whipped egg white to loosen the batter somewhat and then folding in the remaining white.
To fold something in you need to make sort of a cutting motion with your spoon, lifting and turning over the batter so as not to knock the air out of the whites. This gives you a much higher rise in your cake and a lighter texture.
This cake has a beautiful moist crumb and texture, and yet is very light. It is flavored highly with cinnamon.
There is a full teaspoon of ground cinnamon in the full sized version, and half a teaspoon in this smaller version.
I baked it in a heavy, 6-inch round, aluminum cake tin. I picked it up at Winner's yesterday. I know I will use it a lot, and if you are wanting to follow my smaller sized recipes, you need to get one also!
In fact I have ordered another one online as it will be the perfect size for making smaller layer cakes. And I do plan on making more small sized recipes in the future as an ongoing thing.
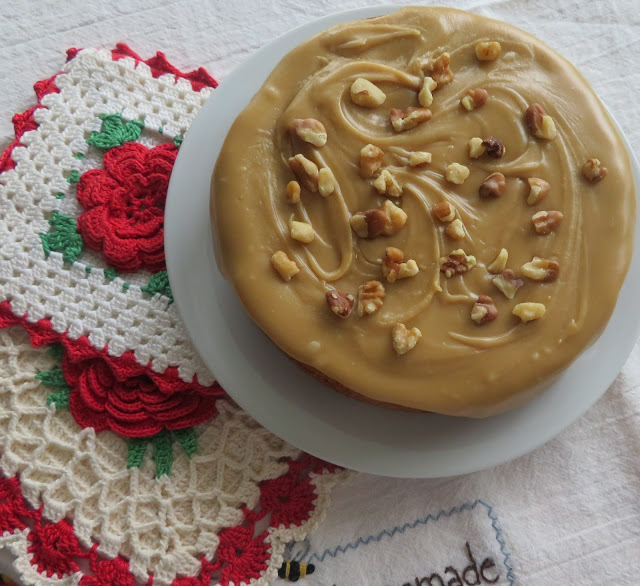
The icing is a very simple make for this. Melt butter and brown sugar together, add some milk, bring it to the boil and then beat in some icing sugar. Easy peasy.
I have often used maple sugar rather than brown sugar with excellent results. And it gives the cake a nice touch of maple flavor. Today I added a few drops of Maple flavoring.
Just spread the icing over the cake and voila! I have always, always added a scattering of chopped toasted walnuts on top myself. I like them and walnuts go very good with maple.
In any case, Spanish Cake for two. Enjoy! Silly me, of course you will! And if you are wanting the full recipe, check it out here.

Spanish Cake (For Two)
Yield: 4 (makes one 6-inch) cake
Author: Marie Rayner
Prep time: 10 MinCook time: 30 MinTotal time: 40 Min
A lovely little cake flavored with cinnamon and topped with a lucious maple cream icing.
Ingredients
For the cake:
- 70g of plain flour (1/2 cup)
- 1/2 tsp baking powder
- 1/2 tsp ground cinnamon
- 60g of butter, at room temperature (1/4 cup)
- 95g of sugar (1/2 cup)
- 1 large free range egg, separated
- 60ml milk (1/4 cup)
For the icing:
- 30g butter (1/8 cup)
- 40g of maple sugar (1/4 cup, can use 1/4 cup loosely packed brown sugar)
- 1 TBS milk
- 65g of icing sugar (1/2cup)
Instructions
- Preheat the oven to 180*C/350*F/ gas mark 4. Butter an 6-inch round baking tin and line the bottom with baking paper. Set aside.
- Beat the egg WHITE until stiff and set aside.
- Sift the flour, baking powder and cinnamon into a bowl. Set aside. Cream together the butter and sugar until light and fluffy. Beat in the egg YOLK.
- Beat in the flour along with the milk making alternate additions. (3 dry and two wet) Mix well. Fold in the egg whites.
- Spread the batter in the prepared baking tin. Bake in the heated oven for 25 to 30 minutes, until the top bounces back when lightly touched and a toothpick inserted in the center comes out clean. The cake should also have begun to pull away from the sides a bit. Remove from the oven.
- Cool in the pan for five minutes then tip out onto a wire rack to finish cooling completely.
- Place the butter for the icing in a saucepan and melt. Add the maple sugar and heat gently over low heat for 2 minutes, until the sugar has melted. Add the milk. Bring to the boil, then remove from the stove and let cool. Beat in the icing sugar and spread onto the cooled cake.
Notes:
I like to sprinkle chopped toasted walnuts on top, but that is the Canadian in me liking the flavor of maple walnut.
Also if you don't have maple sugar and yet still want the flavor of maple, you can add a few drops of maple extract to the melted sugar/butter mixture for the frosting.
Did you make this recipe?
Tag @marierayner5530 on instagram and hashtag it #TheEnglishKitchen
My sister and I went shopping up in New Minas this morning. Since lockdown has lifted and we have both had all of our vaccines we feel a bit safer doing so. We had a lovely morning doing sister stuff.
Its nice to just be able to spend time on our own without any men around, talking girl stuff, having a laugh and being able to window shop, etc. without listening to a man huff and puff in the background.
Letting you know they are bored without saying any words. You all know what I am talking about.
First we went to Michaels the craft store. I wanted to pick up some felt to make some Christmas ornaments. I don't like to just sit and watch television in the evenings.
I like to keep my hands busy with something and since I will be decorating a tree from scratch this year I figured there is no time like the present to get started! Since I am also soon going to be getting a kitten, I figure felt ornaments are the safest route to go.
When we had finished there, we hopped over to Winner's/Homesense. I had a gift certificate to use and it just has the best prices in kitchen ware. I am in need of props etc. to use in my food photography.
And a few gadgets as well, and its the best place to get things like that.
I got myself a set of small dessert bowls, and a relish set, both in what is called Dublin Crystal. Made in China so I don't know how fine it is, lol.
I also got a six inch cake tin. I really wanted two, but there was only one. A quarter sheet pan. Some tart tins, chopsticks. A set of egg poachers, some mini utensils and a wide based spatula/egg flipper.
All will come in very handy in any case. I do miss my Poachies from the UK. They were little paper bags to poach eggs in, very similar in looks to the Myleta coffee filters, except on a much smaller scale.
They were the best things for poaching eggs, but never mind, I will get used to these silicone thingies.
Anyways, it was getting rather late by the time we got back to hers and then I got home and I was starving. I had some cooked chicken in the fridge, and I remembered this delicious Chicken salad recipe I had seen in one of my cookbooks.
The cookbook is by Mary Younkin and is entitled, the Weekday Lunches & Breakfasts Cookbook. It has lots of lovely recipes in it. It is a book I had had in the UK and one of the ones I decided to replace here in Canada.
I decided to halve the recipe however. I actually cut it in half yet again to make only one, but am giving you the measurements to make two to three servings.
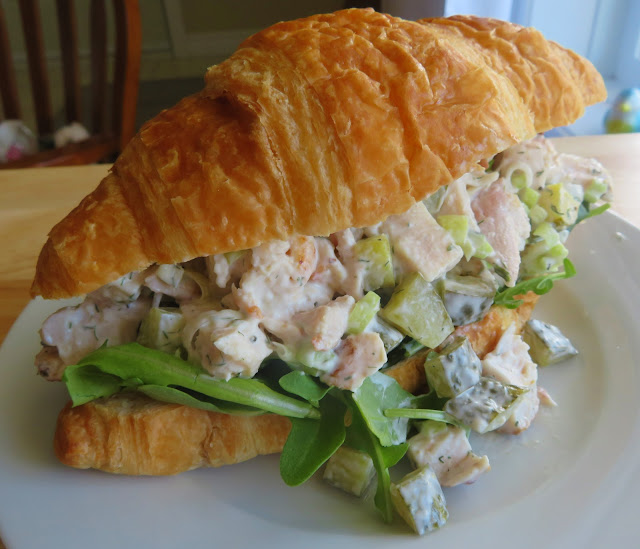
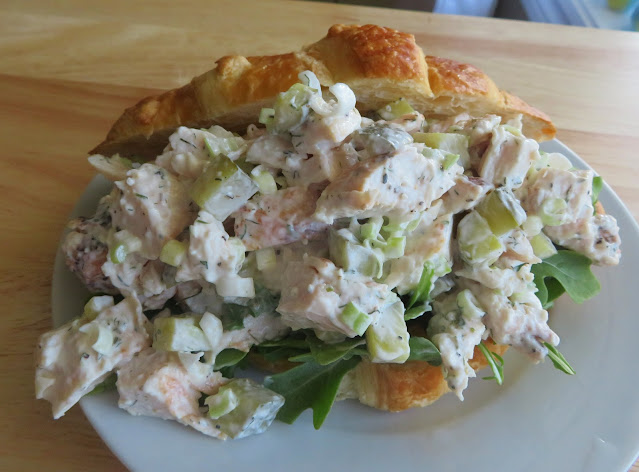
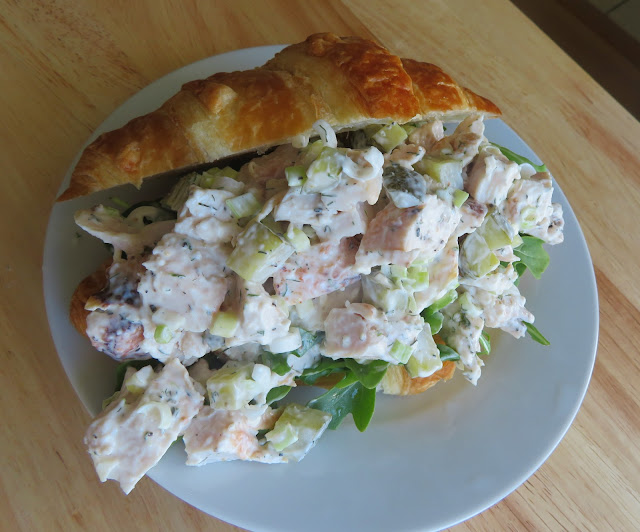
The recipe is called Dill Pickle Chicken Salad Croissants. The photo in the book looked delicious and the recipe was very simple to make, using only a few ingredients.
Cubed cooked chicken. Check. Chopped spring onions. Check. Diced dill pickles. Check.
A variety of seasonings and spices. Salt, pepper, dried dill weed, garlic powder. Check, check, check, check.
A good mayonnaise. I like Hellman's. I buy the olive oil one here. Its really rich and delicious.
You also need some fresh baby greens, arugula (rocket) and spinach. I adore both of those and am trying to get as much iron into me these days as possible, so any way I can eat it, works well with me.
Finally some fresh crisp Croissants to fill with the delicious salad. I picked up a small bag of two on the way home.
Croissants are always best if you pick them up on the day don't you think? Of course you don't have to use croissants.
Any bread will do. Rye bread would be particularly nice, especially the marbled rye, because of the dill pickles in the salad.
Sour dough, white, whole wheat, any kind of bread really. Just pick your favorite kind. I think large crispy and buttery cathead biscuits would be lovely.
If you aren't doing bread in your diet, then this tasty chicken salad would be lovely spooned over a bed of salad greens, or stuffed into a ripe tomato, with some cold rice or pasta, etc.
It would also be great in a wrap or a pita bread. In short, delicious no matter which way you choose to enjoy it.
Its as simple as stirring everything together. Takes all but five minutes to make. And it is truly delicious.
I loved the dill pickles in this, but then again, I am a real dill pickler lover. When my children were growing up I think I made about 52 quarts of dill pickles every year and they always all got eaten.
I just used plain dills, but you could use the garlic dills if you want. I also chose to use baby dill pickles instead of the larger ones.
The chopped pickles really add a lovely crunch, and a nice flavor to the salad. Some of the juice is also used in the dressing.
Chopped spring onion adds a nice hint of sharpness, a bit of color and some nice crunch. I think if you wanted to you could also add some chopped nuts to this if you wanted to, although I am not sure what kind you would like.
Pistachios perhaps? They are green at any rate!
The dressing is a really simple one. Mayonnaise, dill pickle juice, salt, pepper and garlic powder. Simple. Easy.
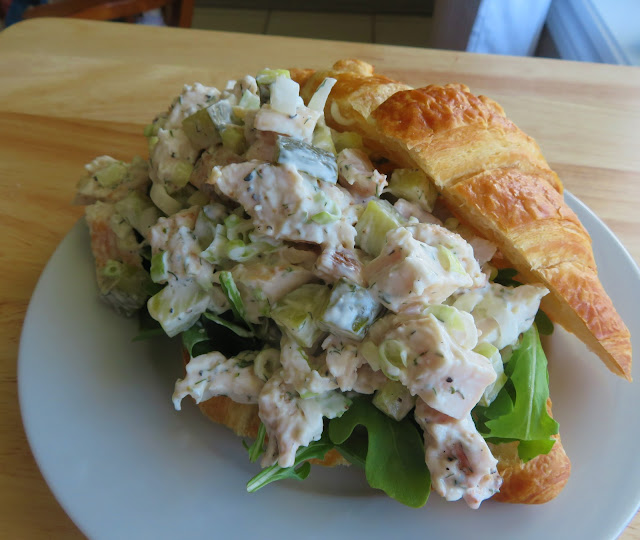
Goes together in a flash and all you need to do then is fold in the chicken, pickles and onions. You're done.
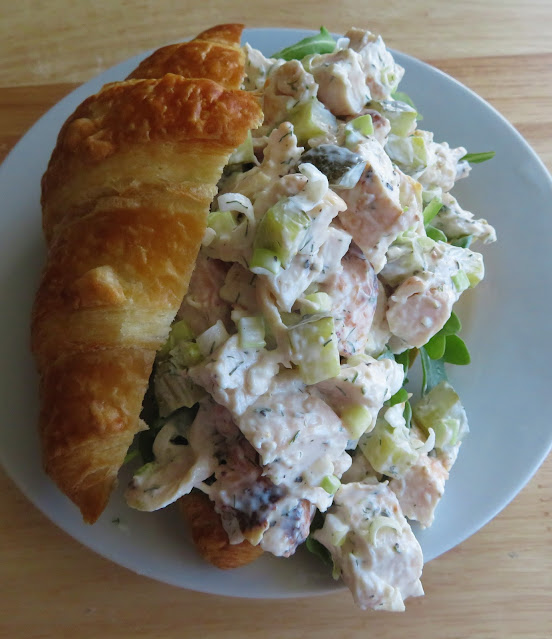
All ready to tuck into that moreish croissant on top of those lush greens. Oh boy but this is some good, and I felt very generous.
A chicken salad sandwich should be messy to eat. That's part of the enjoyment I think, don't you? Pass the napkins and enjoy!
Quick, easy and fairly healthy. Shhh . . . don't burst my bubble.

Dill Pickle Chicken Salad Croissants
Yield: 2 - 3
Author: Marie Rayner
Prep time: 10 MinTotal time: 10 Min
Tender pieces of chicken combined with crisp dill pickle and sharp green onions in a simple dressing to make a delicious sandwich filling. Serve here in croissants, it also works well on its own on a bed of lettuce, or with rye bread, in a wrap, stuffed tomatoes, etc.
Ingredients
- 1/4 cup (60g) good quality mayonnaise
- 1/2 TBS pickle juice
- 1/4 tsp coarse black pepper
- 1/8 tsp fine sea salt
- 1/3 tsp dried dillweed
- 1/4 tsp garlic powder
- 1 1/2 cups (220g) cooked chicken cut into 1/2 inch dice
- 2 medium dill pickles, ends trimmed off and cut into 1/4 inch dice (about 3/4 cup/110g)
- 1 spring onion, washed trimmed and chopped
- 2 to 3 fresh crisp croissants
- a mix of baby arugula and spinach to line the bottom of your croissants
Instructions
- Stir the mayonnaise, pickle juice, pepper, salt, dried dill and garlic together in a bowl. Fold in the chicken, pickles and onions, mixing everything together well.
- Cut your croissants in half lengthwise using a serrated knife. Line the bottoms of the croissants with the greens, then top with the chicken salad, finishing off with the tops of the croissants. Serve immediately.
Notes:
This delicious chicken salad will keep well in the refrigerator in a covered container for up to three days. It is also nice served on a bed of salad greens, without any bread at all, as part of a salad plate.
Did you make this recipe?
Tag @marierayner5530 on instagram and hashtag it #TheEnglishKitchen
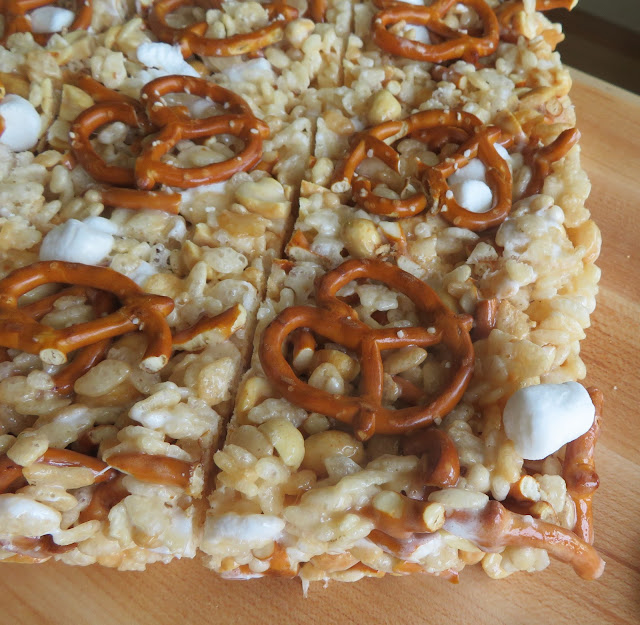
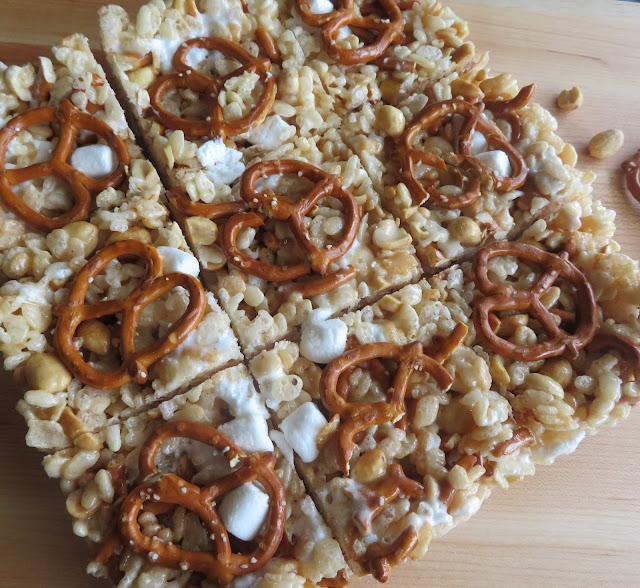
As promised yesterday, I am back today with a delicious recipe and what a recipe it is!! This small batch recipe is crispy, gooey, salty, sweet and incredibly moreish.
I don't know about you, but Rice Krispy Squares have always been incredibly popular in my home. When my children were growing up they were a quick and easy treat for me to make for my family.
My then husband loved them as well and there would be many a night that I would be making up a batch for the family to enjoy. My children always enjoyed a special treat prior to going to bed. We called it a night snack.
Rice Krispy Bars and Mom's Quick Cinnamon Rolls were very popular. I didn't mind making either one because they could both be made very quickly and easily.
Sometimes I would make either Chocolate or Peanut Butter Fudge. And still other times they would simply have toast.
As they got older they would love to help and Always, ALWAYS loved to clean lick the saucepan after we made the rice krispy treats. Good times and simple pleasures!
Full recipes of these goodies are no longer on my menu of things to enjoy, unless I have family over of course, but with Covid you know how much that happens. Zippidy do dah!
Hopefully that will change soon!
I have been in the process of down-sizing a lot of my recipes to suit my smaller sized family. I may even write a small sized family cookbook. We'll see how it goes.
Sweet and salty is a flavor combination many, many people love. There is just something about it that tickles many fancies.
I had found this recipe in a cookbook by Mary Younkin, entitled The Weekday Lunches & Breakfasts Cookbook, but it made a huge 9 by 13 inch pan of squares. Far too many for me to cope with, and I hate waste.
I had actually never made the full batch of these because one, it made so many and B, my husband in the UK couldn't eat anything like this.
I decided this week to small batch it because B, that husband is no longer in my life and two, I like things like this, and why not! Just because you are one or even two people, there is no reason for you not to enjoy some of these simple yet tasty things in life.
In downsizing the recipe I noted a few discrepancies in her original recipe, one being the metric weight of the cereal. She said 568g of the cereal and I can tell you for a fact that a LARGE box of this cereal only weighs 680g.
Its a good thing I always measure and weigh all of my ingredients out in both linear and metric. That's so I can be sure that I am giving you the proper measurements.
I do try to get it right most of the time, but even I am not perfect! And I have to tell you I don't mind people pointing out any discrepancies to me either, or spelling mistakes.
I actually find it quite helpful. Everyone needs more than one set of eyes! Constructive criticism is always welcome!
I have always been a huge fan of the sweet and salty combination. I think most North Americans are. I love to eat milk chocolate with plain salted potato chips.
Peanut butter and Jam are also a real favorite with me. And when you think of it, sweet and sour chicken is also a sweet and salty or savory combination.
I have been craving Chinese food for a few weeks now. I may have to bite the bullet and order myself a Chinese meal from the local Chinese place in town, but back to the squares.
With these you get plenty of crunch and salty from the use of both salted pretzel twists and roasted salted peanuts.
Make sure you use the smaller pretzel twists. The peanuts also add a lovely nutty balance to the mix along with the salty.
The sweet and the gooey come from the use of marshmallows. I use mini white marshmallows, but you could use the equivalent weight in the larger marshmallows, just cut them into quarters first.
White mini marshmallows were something that was very difficult to come by in the UK. You could find plenty of whites and pinks, but it was not very often you could find just whites.
Here in Canada/North America, they come both in whites and in multi-colored. My youngest daughter always loved the squares that I would make at Christmas with butterscotch chips, peanut butter and the colored Marshmallows.
We called them Amanda's Squares because she loved them so much. I wonder does she make them for her two children? I suspect she does.
She's a Nurse Practitioner now, specializing in children's oncology. You have to have a special heart to work in that field.
I could not do it myself because my heart would break every day. I could not be a nurse period. Same reason. I did try candy striping when I was a teenager. It was not for me.
Back in those days if you were a girl you could really only be one of three things if you wanted a career. Teacher, Nurse, Secretary.
Its nice that girls now have so many more options open to them. Me, I never really wanted to be more than a mother and a wife at the end of the day, and I got to do both of those. Call me satisfied.
I am a nurturer and always have been. My sister is also. We are very much alike.
Anyways, make these squares. If you are a fan of salty, sweet, crunchy, gooey, then you will love them.
Its really as simple as that. Quick, easy, scrumptious. If you want the full sized measurements to make the full batch. Just ask. I am more than happy to oblige.
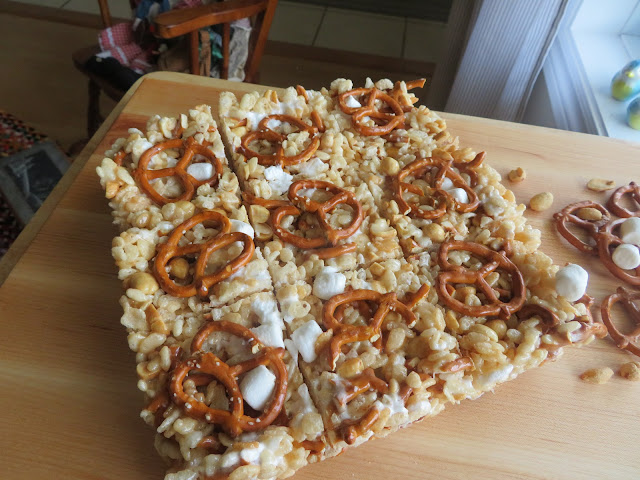
Sweet & Salty Krispy Bars
Yield: 9 squares
Author: Marie Rayner
Prep time: 10 Mininactive time: 2 HourTotal time: 2 H & 10 M
Crunchy, gooey, nutty, sweet, salty. This small batch recipe is a guaranteed winner!
Ingredients
- 3 TBS butter
- 4 cups (200g) mini marshmallows, divided
- 2 3/4 cups (80g) crisp rice cereal
- 1 cup (55g) pretzel twists, broken, plus more to decorate the top (optional)
- 1/2 cup (55g) salted roasted peanuts
Instructions
- Have ready an 8 inch square baking tin that you have buttered and lined with buttered parchment paper. (I butter the pan so that the paper stays in place.)
- Melt the butter in a largish saucepan over medium heat. Add 3 cups (150g) of the marshmallows and stir until they begin to melt. Once the whole mixture is melted and amalgamated remove from the heat.
- Stir in the pretzels, peanuts and cereal, mixing everything together well. Stir in the additional 1 cup of marshmallows.
- Scrape the mixture into the pan immediately and using slightly buttered pans gently press into place. Top with additional pretzel twists if desired.
- Leave to set for a few hours. Cut into squares to serve. Store any leftovers in an airtight container.
Did you make this recipe?
Tag @marierayner5530 on instagram and hashtag it #TheEnglishKitchen
Subscribe to:
Posts (Atom)














Social Icons