Back in the 1980's I had a great friend who lived right next door to me. We lived in a row of town houses and had similarly aged children. Our husbands were both in the airforce. Her name was Mabel and I have to confess I learned a lot about cooking from her.
She was one of my early inspirations. She had three children and I had four. Our days were busy and our hands were full, but every night after supper we would sit together on our shared door step, have a coffee together and talk about our days which had just passed.
We both enjoyed cooking and food and started a supper club between the two of us. One month it would be her turn to host and the next it would be mine.
A three course dinner for four and sometimes we had themes. One month it might be Italian and another Greek.
She did a beautiful German meal for us once that I still remember to this day. They had lived in Germany just prior to moving to Nova Scotia where we were all living at the time and she really did that country proud with her meal.
You know something is good if 35 years later you are still thinking about it!
I have always held a special fondness in my heart for German food. I lived there when I was a child from the time I was an infant until just before I started school. My sister was actually born there.
My husband and I have also travelled there several times on holidays. It is a clean, clean country and the people are very friendly and kind.
The food is amazing. There is no other word for it. I remember having a hot chocolate on one of our first holidays there. I am sure there was at least a six inch tower of whipped cream dancing on the top of it!
It was delicious. Who can visit Germany without enjoying a slice of their infamous Black Forest Cake. It is so delicious.
We have eaten grilled Bratwurst in buns with mustard on the edge of Lake Titisee. Nothing tasted finer.
One day we enjoyed plate sized schnitzels that would make your mother weep, sides hanging over platters adorned with crisp fresh chips and a beautiful salad on the side.
Yes, German food is delicious. Its not overly fancy, but it is incredibly fresh and extremely well done. They have a great pride in what they present to you at the table, and it shows.
My mother often told us the story about how she arrived in Germany with me, only about 9 months old, on a snowy Christmas Eve in 1956. She was very tired after having travelled there from Canada on her own to meet my father who was already there. The airline had lost her luggage and so there we were in a foreign country, where she did not know the language or the people . . . and all we had were the clothes which we were wearing.
My father had managed to rent a small set of rooms for us over a Gasthaus, which would be our home until we were able to get more permanent accomodations on the base. She was in tears, needless to say, afraid and feeling quite lonely being so far away from her family and friends on what is traditionally very much a family occasion. And she was exhausted.
The family that owned the Gasthaus were celebrating their Christmas downstairs, but the wife/mother took the time to cook a meal for my mother and father, a chicken dinner and then she took charge of me.
She tore up a sheet to use as diapers, got me a bottle, giving my teary and bleary eyed mother some rest she so badly needed. My mother never forgot this simple kindness.
Kind, kind people, and this was not long after the War had ended, only 10 years. They were still very much recovering.
The recipe I am sharing today for Pancake Soup is a German Recipe and it is delicious in its simplicity. It is also known as Crepe Soup or Fladlesuppe.
In Swabia where it comes from, pancakes are known as Fladle. The recipe has been adapted from a cookery book I have entitled, Grandma's German Cookbook by Birgit Hamm and Linn Schmidt.
Put into shallow bowls they are simply covered in a good strong broth. You can use Chicken, or beef or vegetable. The recipe was originally designed to use up leftover broth from the day before.
Today I have used chicken stock which I buy in little gel-capsules. It has a lovely flavour that we both enjoy and I use it a lot. Generally speaking I always have chicken, beef or vegetable pots gel pots in my larder. Very handy to have.
This soup is incredibly delicious in its simplicity. A good stock and rolled up sliced pancakes that act almost like hearty little noodles. Scattered with some finely snipped chives it makes a wonderful light lunch or first course.
You could also garnish it with some wild garlic scapes, thinly sliced (in season) or chopped parsley. I think as well chopped fresh thyme would also be very nice.
I can remember being on holiday in France and walking through some fields on a 13km hike we went on one day. Every step we too smelled like garlic. There was wild garlic everywhere. Oh I do so love Europe and I really hope that I will get a chance to travel there again on holiday.
I really hope that you will be inspired to try this soup. Don't let its simplicity or simple list of ingredients put you off. It is a true gem of a recipe and a wonderful testimony to a people who know how to make the most out of what they have been given.
Its comforting and delicious and a true pleasure to eat. I think also that children would really enjoy this simple soup. Pancake Soup, its a good thing, not to coin Martha Stewart or anything. Make it. You will love it.
Pancake Soup
Yield: 4
Author: Marie Rayner
prep time: 15 Mcook time: 15 Mtotal time: 30 M
This is also known as Crepe Soup or Fladlesuppe. German in origin it was developed to be able to use up leftover sock. Rolled up pancakes, sliced into coins act as noodles. Its quite simple but extremely delicious!
Ingredients:
For the pancakes:
- 2/3 cup of plain flour (100g)
- 2 large free range eggs
- 1 1/3 cup whole milk (300ml)
- 1/2 tsp salt
- pinch of freshly grated nutmeg
You will also need:
- butter for greasing the pan
- 1 bunch chives, finely snipped
- 4 cups (960ml) hot chicken, beef or vegetable stock
- black pepper to taste
Instructions:
- Begin by making the pancakes. Measure the flour into a bowl along with the salt and nutmeg. Beat in the milk and the eggs until you have a smooth, lump-free batter. Let stand for 15 minutes.
- Heat a skillet (I found a six inch skillet worked best for me.) Butter with a tiny bit of butter. Using a soup ladle, pour in just enough batter to cover the bottom of the pan in a thin layer. Cook until beginning to brown, flip over and cook for a further 30 seconds. Remove to a plate and repeat until you have used all the batter up. Keep warm.
- Roll the pancakes up tightly and slice crosswise into thin rounds.
- Evenly divide the warm pancakes between four shallow heated soup or pasta bowls. Divide the hot stock between the bowls. Sprinkle with pepper and chopped chives. Serve immediately.
Did you make this recipe?
Tag @marierayner5530 on instagram and hashtag it #EnglishKitchen
Created using The Recipes Generator
This content (written and photography) is the sole property of The
English Kitchen. Any reposting or misuse is not permitted. If you are
reading this elsewhere, please know that it is stolen content and you
may report it to me at: theenglishkitchen@mail.com
Thanks for visiting me today! Do come again!
At the weekend I like to pull out the stops a bit and make my husband a delicious dessert. We only ever very rarely eat dessert the rest of the week. If we do have anything at all it will be pots of yogurt or once in a blue moon a sneaky mini-magnum bar or a two finger kitkat.
This weekend I had some stale brioche bread that I wanted to use up and so I decided to make a small batch bread pudding, perfectly sized just for two. Sweet Almond Bread Pudding. And I made a sauce to serve with it as well, a blackberry sauce. Two generous servings of decadent deliciousness.
You can use any stale brioche that you might have in the house. I had a stale poppyseed swirled brioche that I had gotten with my grocery order. It was so yummy, but inevitably we did not get it all used up.
It was the perfect bread to use in this pudding. Just rich enough. Not too sweet. And the poppyseed swirl worked well with the other flavours.
You could use any stale bread really. Stale croissants. Stale biscuits. Stale hot dog buns. Stale baguettes. All bread once it is stale is quite suitable for using in a bread pudding.
The reason we use stale bread is because it will soak up the egg custard mixure more readily. Fresh soft bread just doesn't have the ability to absorb liquids in quite the same way and you will have a soggy finish. Not good.
As it is you will need to dry/toast the bread in a slow oven for ten minutes to dry it out even more. You don't want it crisp, but you do want it quite dry.
Dry enough to be able to absorb all of that rich custard and trust me, this is one mega-rich custard, but not at all in a bad way . . . but in a very good way indeed! It is simply sugar, egg yolks and heavy/double cream!
Rich and decadent and flavoured with both pure vanilla and almond extracts. Simple flavours, with astonishing results. I could eat that custard with a spoon.
The cream is heated first with half of the sugar. You don't want it to boil. You just heat it until it begins to steam and bubbles show up all around the edges. Boiling might curdle it.
Let cool just a bit and then whisk it into two large free range egg yolks which you have beaten together with the remaining sugar and the flavourings.
You have to do this a little bit at a time or else you will cook the eggs, which is something you really don't want to do. I start by drizzling it in just a tiny bit at a time until I have about half the cream whisked in.
At that point it is safe to whisk in the remainder of the cream/sugar mixture. That completes the custard. Oh but it does smell delicious and we are really only just beginning!!
The custard is then divided between the two ramekins. You must press the bread down into the custard until it is covered, then you play a bit of a waiting game while the bread absorbs that rich custard.
The puddings are baked in a Bain Marie, which is a fancy name for a water bath. You put them into a baking dish and then fill it halfway full with boiling water. This helps to keep the puddings moist and helps them to bake properly without drying out too much. You want them a bit jiggly.
I do have to laugh when I think back to when I first started cooking. I have always had a great interest in food and cooking and recipes. I was watching cooking shows when I was still a teenager and at school.
My mother went back to work when my brother started school. She had housekeepers for about a year, but they didn't really work out. After that I was old enough that I became the one in charge of the house while my parents were both at work. I was twelve.
I had some household chores to do, my younger siblings to watch and supper to get started. Mostly I was just reheating what my mother had already prepared but every once in a while I got to actually cook. Especially once I had started Home Economics classes at school and knew a little bit about what I was doing.
I slowly through the years gained skills and knowlege. Some gleaned from friends and much from watching television and reading magazines. I thought I was quite capable back then, and perhaps I was to a degree, but I would have had a puzzled look on my face had anyone asked me what a Bain Marie was! (Despite how much I thought I knew!)
It was really not much at all in comparison to what I know now, and most of that I learnt by doing and growing and cooking. Raising a large family taught me much, and of course I eventually went to Culinary College which taught me more.
In retrospect I should have gone to Culinary School out of high school instead of secretarial. My cooking skills have served me very well through the years, much more than my secretarial skills have done, with the exception of typing.
But back to the pudding. They are done when they are nicely puffed and just a bit jiggly. They will be golden brown on top, the nuts having toasted and the sugar nicely glazing the tops.
While they are baking you can make your blackberry sauce. If you haven't got blackberries, feel free to substitute raspberries in their place. They will be just as delicious. Another name for the sauce is a berry coulis.
Its lovely, not too sweet, but slightly tart and coloured like a jewel. I tried to be a bit fancy and spread some beneath the puddings in a pattern before I set the puddings on top. That only lasted until I popped the puddings onto the pattern. Oh well . . . best laid plans and all that.
These puddings are best served warm with the cold blackberry sauce. You can make the puddings ahead of time, keeping them wrapped tightly for up to three days in the refrigerator. (This makes them perfect for celebratory dinners!)
Gently reheat to warm. (I would steam them for a few minutes in top of a double boiler.) Serve warm with this fabulous blackberry coulis, these are puddings worth more than an ounce of applause!
Sweet Almond Bread Pudding with Blackberry Sauce
Yield: 2
Author: Marie Rayner
prep time: 15 Mcook time: 1 hourtotal time: 1 H & 15 M
Simple to make and yet outrageously delicious!
Ingredients:
For the pudding:
- 4 ounces of stale Brioche, cut into 1 inch pieces (about 1 heaped cup)
- 1 cup (240ml) heavy cream
- 6 TBS granulated sugar
- 2 large free range egg yolks
- 1/2 tsp pure vanilla extract
- 1/2 tsp almond extract
To top pudding:
- 2 TBS flaked almonds
- 1 tsp finely granulated sugar
For the blackberry sauce:
- 2 cups (170g) of blackberries, fresh or frozen
- 1/3 cup (65g) sugar
- 1 TBS fresh lemon juice
Instructions:
- Preheat the oven to 160*C/325*F/ gas mark 3. Butter two (8 ounce) glass baking ramekins really well. Set aside.
- Cut the bread into 1 inch cubes. Place onto a baking sheet and toast in the oven for 10 minutes. Remove.
- Heat the cream with half of the sugar just until bubbles appear around the edges and it is steaming. Do not allow to boil. Keep warm.
- Whisk the egg yolks with the remaining sugar and extracts until smooth. Slowly whisk in the warm cream mixture a little bit at a time to temper the eggs. Once the eggs have heated you can just whisk in the remainder of the cream.
- Divide the bread cubes between both ramekins. Strain half of the custard over each ramekin and lightly press down so that the bread is soaking. Leave to soak for 20 minutes.
- At the end of that time put the ramekins into a baking dish with sides, large enough to hold both of them. Sprinkle the top of each with 1 TBS of flaked almonds and half the sugar.
- Fill the baking dish to halfway up the sides of the ramekins with boiling water.
- Place into the oven and bake for one hour, or until the custard is set.
- While the puddings are baking make the sauce. Put the blackberries into a saucepan with the sugar and lemon juice. Bring to a simmer. Leave to simmer for 2 minutes. Blitz until smooth with an immersion blender. (or a regular blender) Strain through a sieve.
- Unmold the warm puddings onto a dessert plate and drizzle some of the sauce over top. Refrigerate any leftovers.
Did you make this recipe?
Tag @marierayner5530 on instagram and hashtag it #EnglishKitchen
Created using The Recipes Generator
his content (written and photography) is the sole property of The English Kitchen. Any reposting or misuse is not permitted. If you are reading this elsewhere, please know that it is stolen content and you may report it to me at: theenglishkitchen@mail.com
Follow my blog with Bloglovin
Its that time of year again. If you are a vegetable gardener you will know exactly what I mean. Its zucchini glut season! That time of year when you have zucchini, or courgettes are they are known here in the UK, coming out your ears!
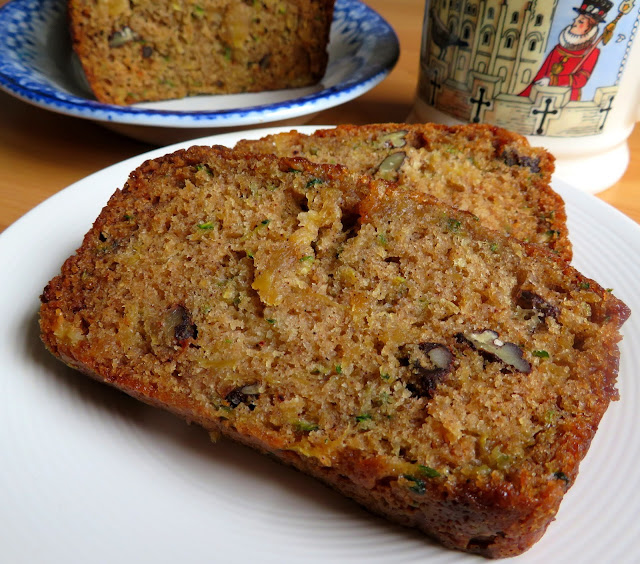
That time of the year when you think if you see just one more zucchini you are going to scream, and then . . . you remember things like this delicious Pineapple Zucchini Loaf and all of a sudden everything is alright in your world again.
I think zucchini has to be one of the most prolific of garden vegetables. You think you have picked it all and then it surprises you with a gargantuan one, the size of a small dog that's been hiding underneat all of the leaf cover.
You find yourself wondering how on earth you could have missed such a thing, but there it is. Its huge and you did actually miss finding it sooner.
I'm not sure about you, but personally I like to pick my zucchini and use it when it is about the size of a large banana. Any larger than that and I find it is pretty tasteless. It does work very well however in bakes such as this delicious loaf.
I usually cut it in half, discard all of the seeds and then grate the rest. It actually freezes very well. You can pack it into zip lock freezer baggies, in 2 cup measures, ready to use all the winter through.
Zucchini makes a superior quick bread. It always comes out moist and flecked with green. This particular recipe which contains crushed pineapple is a particular favourite of mine.
Its light and takes well to the warm baking spices and toasted nuts. I have used pecans today, but walnuts also work very well. I always toast my nuts for baking. Toasting makes them taste even nuttier!
Today I used smaller zucchini, about the size of a large banana. Their cylindrical shape of this summer vegetable makes it very easy to hold and to grate.
I use the large holes on my box grater. If you use anything smaller, it will turn to mush. I also prefer the texture of hand grated over machine grated.
Zucchini has a very high water content, so take note. No liquid is needed in this recipe, other than the oil. I have not left anything out. There is no milk or yogurt or any other liquid.
Just the zucchini and the crushed pineapple. I do drain the pineapple well, but I leave the zucchini as is. There is no need to squeeze the liquid out of it. Don't you just love those bright green flecks? I do. Its almost Christmas-like!
I baked this in two metal loaf tins, one was slightly larger than the other, but both were basically 9 by 5 inches in size. You can use pyrex loaf pans if you want, but if you do, you will want to reduce the oven temperature to 160*C/325*F/ gas mark 3.
I just use my shiny silver loaf tins. Aluminium foil ones are also nice. You know, the disposable ones? You can use them over and over a few times, simply placing them in the dishwasher on the top rack to clean, before you need to get rid of them.
Baking them in aluminium foil also makes them very handy for gifting. Our next door neighbour has been so kind to us throughout this Pandemic. Always picking us up bread and milk without us even having to ask.
She was very pleased to be gifted with one of these loaves. Zucchini Loaf is something new to the British. Its not something they ever think to do with this vegetable.
Stuffed marrow is not something I have ever taken a liking to, although I do like stuffed zucchini. I like mine stuffed with vegetables, cheese and crumbs however, not meat.
You can also freeze this easy loaf. Just make sure you wrap it up really well in some cling film. I tend to double wrap it and then wrap it again in some aluminium foil. Make sure you add a label so that you know what it is.
Yes, I am one of those people who freezes things and then can't figure out what the heck it is when I go to thaw it out. I have been surprised many times over. Now I label things. You should too. You can keep it frozen for about 3 months or a bit longer.
Pineapple and Zucchini Loaf is one of those quick breads that begs to be eaten, still warm from the oven with a hot cuppa of whatever hot drink you enjoy and spread with cold butter.
Oh it is so good with that cold butter melting down into it. Spicy, sweet, buttery and nutty. What more could a person ask for???
Pineapple & Zucchini Loaf
Yield: Makes 2 (9 X 5-inch) Loaves
Author: Marie Rayner
prep time: 15 Mcook time: 1 hourtotal time: 1 H & 15 M
This is a superior Quick Bread. Its incredibly moist and delicious and flecked with green and bits of pineapple. Make one loaf to keep and one to give away or freeze.
Ingredients:
- 3 cups all purpose flour (420g plain)
- 1 cup toasted chopped pecans (120g)
- 2 tsp baking soda
- 1/2 tsp baking powder
- 1 1/2 tsp ground cinnamon
- 1 tsp ground allspice
- 1 tsp salt
- 3 large free range eggs
- 3/4 cup vegetable oil (180ml)
- 1 cup firmly packed soft light brown sugar (200g)
- 1 cup granulated sugar (190g)
- 2 tsp pure vanilla extract
- 2 1/2 cups grated zucchini (430g, about 2 medium courgettes)
- 1 (8 1/2 oz) can of drained crushed pineapple (240g)
Instructions:
- Preheat the oven to 180*C/350*F/ gas mark 4. Butter two 9 by 5 inch loaf tins and line with paper, leaving an overhang to help easily lift it out.
- Whisk together the eggs, both sugars, oil and vanilla until thick and fuffy using an electric mixer. Fold in the grated zucchini and well drained pineapple
- Sift together the flour, soda, baking powder, cinnamon and allspice. Stir in the salt.
- Fold into the wet mixture, along with the toasted pecans, making three additions. You should have a moistened batter which is evenly combined with no patches of dry flour.
- Divide the batter equally amongst the two baking tins.
- Bake in the preheated oven for 55 to 60 minutes until golden brown and the edges have started to pull away slightly from the tins. A toothpick inserted in the centre should also come out clean.
- Let rest in the pan for 5 minutes before lifting out to a wire rack to cool, right sides up. Serve in thick slices or store at room temperature, wrapped tightly for up to three days.
- This also freezes well, wrapped tightly for up to three months.
Did you make this recipe?
Tag @marierayner5530 on instagram and hashtag it #EnglishKitchen
Created using The Recipes Generator
This content (written and photography) is the sole property of The English Kitchen. Any reposting or misuse is not permitted. If you are reading this elsewhere, please know that it is stolen content and you may report it to me at: theenglishkitchen@mail.com
Follow my blog with Bloglovin
Hamburger Gravy. This might not be the most attractive dish to look at. Most brown food isn't, but what it lacks for in looks, it more than makes up for in taste.
This classic old fashioned entree was a very common simple supper dish that was served up in many homes when I was growing up. Not only was it incredibly economical, but it was also and IS also very quick and easy to make!
Hamburger Gravy is a supper dish which has been pleasing families and their budgets for many years and still does to this day.
This week I decided to small batch my old recipe to am amount more fitting with the smaller family, and with great results.
If you are wanting to feed a larger family, you can certainly double up on everything! We are not talking rocket science here. Just multiply everything by two!
This is a very simple recipe, which is very quick to make and requires very simple, and humble ingredients.
WHAT WILL YOU NEED:
There is nothing really complicated here.
- ground beef
- flour
- milk
- stock
- seasoning
- dry onion soup mix, just a TBS (my secret ingredient)
I like to use extra lean ground beef, and in fact, more often than not, I use ground steak. When you are using a regular fatty type of ground beef, bear in mind that you are going to be pouring almost half of its weight down the drain.
You are actually paying for something which you won't be able to eat. All of that extra fat melted = waste. Nobody wants to eat grease and so, it simply gets drained off. You are then left with less than what you paid for!
Its quite simple really!
This is a supper option that goes together very quickly. That makes it perfect for those days when you are rushed off your feet.
We all want to feed our families delicious food, but sometimes we are so tired at the end of the day we just don't have the energy needed to put together something spectacular!
Those are the times when we need recipes just like this one! You can have it sitting on the table in front of your family within a very short period of time.
I am a person who loves to make a great use of convenience whenever I can. I make it a habit to have several ingredients in my freezer at all times which help to make things move more quickly in the kitchen.
I always keep bags of frozen mashed potatoes in the freezer. Not only are these very convenient and quick to use, but with a few added bits, you can't really tell the difference between them and old fashioned created from scratch mashed potatoes.
I usually will add a bit of seasoning and some sour cream or extra milk to add flavour and creaminess. You can also add cheese, or a mix of herbs and seasonings.
I like to keep bags of frozen chopped onions in the freezer. Not having to stop, peel and chop an onion makes things even more quicker, and in a dish like this, using frozen chopped onion really won't make much of a difference to the texture or the flavour.
I confess that when I was a child I was not overly fond of Hamburger Gravy. I have no warm, nostalgic, or fuzzy wuzzy feelings about it.
I think that is because my mother always used really cheap ground beef which was high in fat and gristle. I know she was trying to save money, but again, you end up draining half it it away.
Out of our five family members, I was always the one who got the gristle or . . . shudder . . . the odd piece of bone. I have a really strong gag reflex and this just totally turned me off. Tell me I am not alone here!
Lets just say, it was not my cup of tea. I do enjoy it very much now however. Using ground steak makes all the difference in the world.
You can actually (in most cases) get the butcher to grind it right in front of you. Did you know that when you are buying a package of ground beef at the grocery store, that package of meat may have come from more than just a few animals?
Its true. It all gets ground up en masse and then broken down into smaller packages. I would much rather know that what I am eating only came from one, very traceable animal.
I also try to get organic, grass fed if I can, but that is a personal preference. We don't eat red meat very often. and when we do, I want to know that its good and the best I can buy.
The gravy for this dish is really flavourful . . . thick and rich . . . and delicious. We enjoy it spooned over fluffy mashed potatoes.
But back home in Canada, it is also enjoyed served over hot chips with peas and cheese. They call it Hot Hamburger Poutine, or All Dressed Poutine.
Hot thick, crisp hand cut fries, with the hot beef and gravy ladled over top. Cheese gets scattered over top of that so that it melts, becoming all gooey and oozy. Sometimes there will be a scattering of peas on top as well.
I have never made it this way for Todd, but I am sure he would really love it! Who wouldn't??? Maybe next time I will.
In a way, this is somewhat like a deconstructed type of Cottage pie. It has many of the same elements, but put together in a simpler and different way. Equally as delicious I think, maybe even more so.
This is also a very adaptable. This version I am showing you today is at its very simplest. You can also add sliced mushrooms when you are browning the meat, which would sort of make it a kind of a Beef Burger Stroganoff.
A dollop of dairy sour cream can be added for an extra special rich touch to the dish. I have also added a dollop of cream cheese in the past. Very yummy indeed!
I suppose what I am really trying to say is that it truly is the extra simple things in life which bring us the most pleasure.
Things like doggie cuddles, golden sunsets, love of family, good friends, and . . . yes . . . Hamburger Gravy.
Hamburger Gravy
Yield: 3
Author: Marie Rayner
prep time: 5 Mcook time: 25 Mtotal time: 30 M
I small batched one of our favourite meals. You can easily double the ingredients to feed more people. This might not be very attractive but it is delicious. We enjoy it spooned over mashed potatoes with a vegetable on the side.
Ingredients:
- 1/2 pound lean ground beef
- 1/2 small onion, peeled and diced
- 1 clove garlic, peeled and minced
- 1/2 TBS Worcestershire Sauce
- 1 1/2 TBS plain flour
- 1/2 cup (120ml) milk
- 1/2 cup (120ml) beef broth
- 1 TBS dry onion soup mix or a beef boullion cube
- salt and pepper to taste
Instructions:
- Heat a large skillet and brown the ground beef in it along with the onion until no more pink remains. Do not drain. If there is no fat in the bottom of the pan you may need to add a tablespoon of butter or oil. (I would always go with the butter.)
- Stir in the Worcestershire sauce. Stir in the flour and cook for several minutes to cook out the flour taste.
- Add the remaining ingredients, stirring everything together well. Cook over moderate heat until thickened and bubbly. If you think it is too thick you can more boullion or some water.
- Taste and adjust seasoning as required. Serve hot, spooned over mashed potatoes.
- This freezes well if you want to double it and freeze the extras.
Did you make this recipe?
Tag @marierayner5530 on instagram and hashtag it #EnglishKitchen
Created using The Recipes Generator
This content (written and photography) is the sole property of The
English Kitchen. Any reposting or misuse is not permitted. If you are
reading this elsewhere, please know that it is stolen content and you
may report it to me at: theenglishkitchen@mail.com
Subscribe to:
Posts (Atom)
Social Icons