I have become very thrifty over these past weeks. Something I am ashamed to say that I should have been practicing all along. Nothing is going to waste in my kitchen. They are saying it could be six months until the present crisis is over and I am keen to make everything we have stretch as far as I can.
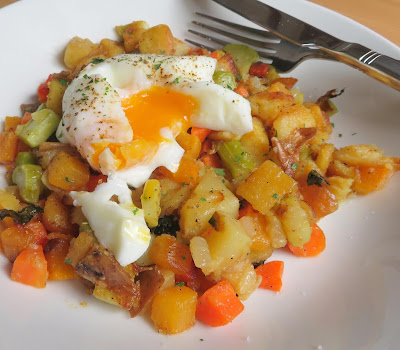
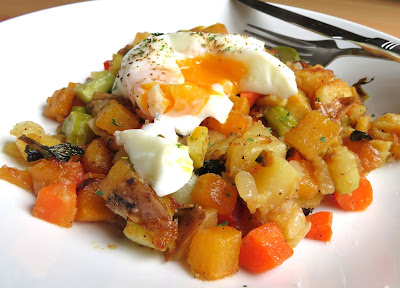
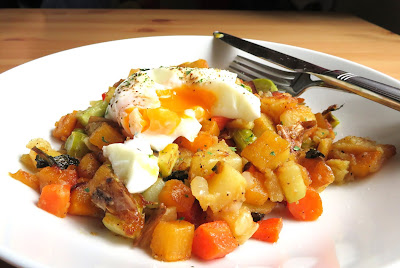
Any thing hash is a great way to make good use of just whatever you have in your refrigerator that needs using up and topping it with a poached egg, turns it into a well balanced meal, containing some carbs, plenty of veg and a protein.
It also makes a great vegetarian meal, for those of you who are not opposed to eating eggs.
The hash is composed of whatever you happen to have in the refrigerator that needs using up. In my case I had a baked potato left from the other day, which wouldn't have fed two people normally, but when you add a host of other vegetables to it, it becomes like the loaves and fishes and magically multiplies to feed more.
I had a head of broccoli in the refrigerator, some carrots and a swede (rutabaga). The stems on broccoli are often wasted and thrown away. They can tend to be a bit fribrous, but if you trim of any fribrous bits there is no reason why you can't eat the rest. You can also eat the leaves of broccoli.
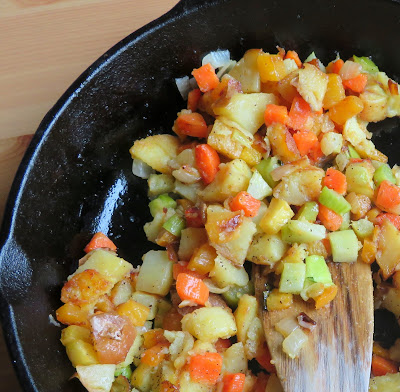
All of my veg was cut into 1/2 inch cubes and tossed together with a small chopped onion and then cooked together in my iron skillet, along with some oil and butter.
I cooked it first over low heat, covered so that the raw vegetables could cook to crispy tender and then I turned up the heat, seasoning it all with some salt and pepper, and cooking it until I had some golden brown carmelised bits. The perfect hash.
You could of course add a quanitity of chopped cooked meat to this, along with some herbs, but I didn't have any lefover roast or any other meat that needed using and so I decided to top the hash with poached eggs.
You could, of course, do a fried egg, but I figured we would both benefit from the healthier option and so I poached us each an egg.
People can be a bit afraid of poaching eggs, but there is no need to be afraid really. I have given exact instructions to give perfect results.
It helps if your eggs are at room temperature. I also like to break them into a small bowl before slipping them individually into simmering water. Don't ever tip them into boiling water or they will break up all over the place.
Cook them on the heat for exactly one minute, then take them off, cover the pan and let them sit for exactly ten minutes. You will have perfectly poached eggs. Ready to scoop out with a slotted spoon onto kitchen paper towelling.
Once drained they are ready to use in any way you want. In this case, atop a nice plate of crispy anything hash!

Anything Hash & Perfectly Poached Eggs
Yield: 2
Author: Marie Rayner
A delicious supper for two which makes a good use of what's in the refrigerator
Ingredients:
- 2 cups of vegetables cut into small cubes (today I used a leftover baked potato, some carrot, some swede(rutabaga), broccoli stems and a small onion)
- 1/2 TBS butter
- 1/2 TBS oil
- salt and black pepper
- 2 large free range eggs
Instructions:
How to cook Anything Hash & Perfectly Poached Eggs
- Prepare your vegetables. Peel the carrots and swede, trim any fibrous bits from the broccoli stems, saving any leaves. Chop them all into a uniform size along with the potato and onion.
- Heat the butter and oil in a heavy based skillet. (I used my cast iron.) Once the butter begins to foam, add the vegetables. Turn them to coat in the fat then turn the heat down low, cover and allow to cook over low heat for about 10 minutes until everything is tender. Remove the lid, turn up the heat, season to taste with salt and black pepper and cook, turning over occasionally until golden brown in places. Keep warm while you poach your eggs.
- Have all your eggs at room temperature and break each into a small bowl before you start. Bring a pot of water, to which you have added 1 tsp of vinegar, to a slow simmer over gentle heat. Once you can see tiny bubbles on the bottom of the pan, carefully add the eggs, one at a time.
- Simmer, without covering for exactly 1 minute. Remove the pan from the heat and let the eggs sit in the hot water for exactly ten minutes. (a timer is incredibly useful here) At the end of the time you should have a perfect poached egg, with a beautifully translucent and pefectly set white and a soft and creamy yolk. Remove the eggs with a slotted spoon, one at a time onto some paper kitchen toweling to drain.
- Divide the hash and spoon it onto heated serving dishes. Top each serving with a poached egg and serve immediately.
Did you make this recipe?
Tag @marierayner5530 on instagram and hashtag it #EnglishKitchen
Created using The Recipes Generator
The skys have turned to pewter today and it is threatening of rain. March is about to go out like a Lion methinks! Oh well, so much for that old wive's tale as it came in like a Lion as well!
In January I started writing on another site called Home Chef World. I was hired to provide them with between 4 and 8 recipe posts a month. This is in addition to what I share here.
I have really enjoyed doing it thus far and I hope this lasts a long longer than my other job did. One never knows with the unstable world we are living in at the moment, but one thing is for sure, people will always want and need to eat.
One of the recipes I will be sharing on there over this next month required English Muffins. Do you think I could find any? None to be had anywhere, and I tried.
We are living in precarious times and I have realised that certain things have become very difficult to find. One is flour (we won't talk about toilet paper).
I am rationing my flour out very carefully because I don't know how long it will be before I can get any more. It has become a very precious commodity in this house.
I did a lot of research before I picked a recipe to try. I am not the most experienced bread baker and my results have always tended to be a bit hit and miss.
I found this recipe on a site called Bigger Bolder Baking. It also had a video, and quite a few good reviews, so I felt fairly confident in using this recipe
It differed a bit somewhat in the English Muffins I am used to in that there is no cornmeal or semolina involved. Some recipes use this to keep the dough from sticking to things.
You do need to start it 18 hours prior to when you want to bake/grill them.
You do not need an oven for these. They cook entirely on top of the stove in a large non-stick skillet with a lid.
I found that my dough was a tiny bit drier than what hers looked like, so I was a bit worried that it wouldn't turn out, but my fears were completely unfounded. It was perfect.
They cooked very easily in my largest skillet. I was going to use my griddle pan until I realised I didn't have a lid to cover it. DUH.
Using a lid to cover the muffins while they are first baking is integral to the success of the recipe. This action allows them to rise higher and to cook thoroughly.
You might be interested to know that English Muffins are not really English at all, although they were invented by an English Ex Pat, living in New York City named Samuel Bath Thomas back in 1874.
Invented in America by an Englishman. He owned a bakery known as Chelsea (could there be a more British name?) and were originally called Toaster Crumpets.
They were very quick to catch on and became very popular in Hotels and restaurants, soon taking on the name of "English Muffins."
The best way to open up an English Muffin is to run the tines of a fork into them all around the centre of the circumference of the warm muffins. Once you have done that. it is very easy to gently pull them apart.
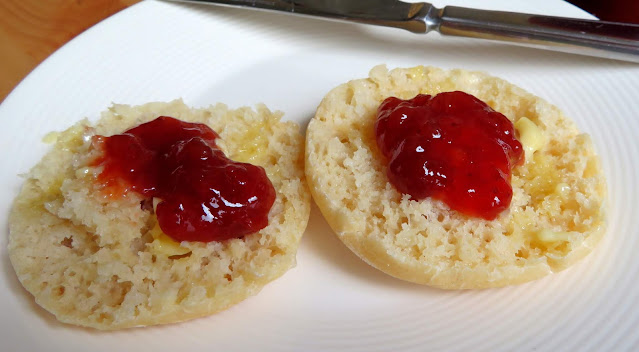
This helps to prevent them from being squashed . . . they are filled with lovely butter catching holes, nooks and crannies and separating them with a fork helps to create even more.
Oh my . . . I have fallen in love. Their texture was beautiful.
My husband enjoyed one later on, toasted on the open side under the hot grill and those little nooks and crannies, toasted up really nicely.
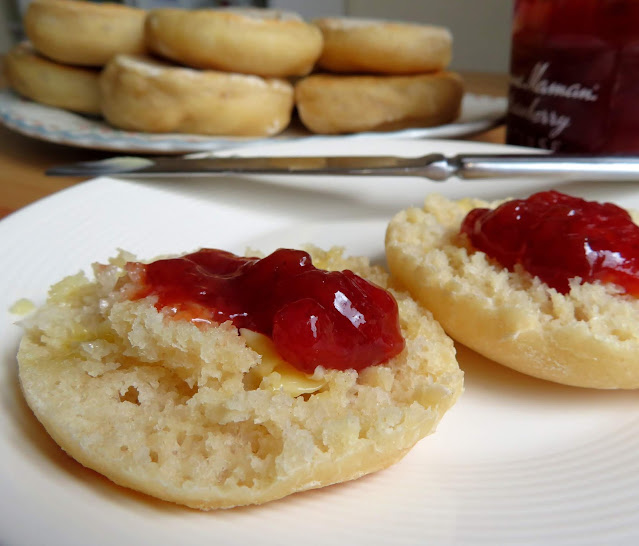
Just beautiful . . . . I enjoyed one warm from the oven with some cold butter thinly sliced over top . . . .
and some Bonne Maman Intense strawberry jam. Oh boy, but this was sooooo good!
They were light and fluffy, beautifully golden brown on the outside and crisp at the edges . . .
I could find no fault with them, no fault at all . . .
In fact the worst thing I have to say about these is that once you have tried one you will never ever be happy again with a ready made one. Never ever.

English Muffins
Yield: makes 8 to 10
Author: Marie Rayner
These are fabulous. The worst thing you can say about them is that once you eat one of these you will be forever spoilt from ever enjoying a store made muffin again. You will need to start these the day before.
Ingredients:
- 350g strong bread flour (2 1/2 cups)
- 1/4 tsp bread machine yeast
- 1/4 tsp fine sea salt
- 160ml milk (2/3 cup)
- 120ml water (1/2 cup)
- 1 TBS salted butter
Instructions:
How to cook English Muffins
- Sift the flour into a large bowl. Add the yeast on one side of the bowl and the salt on the other. Don't let them touch as salt kills yeast. Mix lightly together.
- Measure the milk and water into a microwave safe jug. Add the butter. Cook for about 30 seconds in the microwave to melt the butter and slightly warm the milk mixture. The temperature should be only blood warm. Take care not to over heat.
- Holding some of the liquid mixture back, stir it into the dry mixture, adding only enough to give you a soft dough. It may be a bit sticky, and you may not need it all. Cover bowl with a sheet of plastic cling film and then cover with a clean tea towel. Set aside in a warm, draft free place for 12 to 18 hours. (You can refrigerate the dough after 18 hours if you are not quite ready to griddle them.)
- When you are ready to bake, dust a surface lightly with flour. Scrape the dough out onto the surface. Recover with the cling film and kitchen towel. Let rest for 10 minutes.
- Line a baking tray with baking parchment.
- At the end of the rest time, gently pat out to a thickness of about 1 inch. Using a sharp 3 inch round metal cutter dusted in flour, stamp out rounds, removing and placing them onto the baking sheet as you cut them out, leaving plenty of space in between. Continue until you have cut all the rounds out. Any scraps leftover can be rerolled and cut into rounds, although they won't be quite as perfect in appearance as the others.
- Cover the muffins with cling film and the kitchen towel and set aside to rest for 45 minutes.
- At the end of that time heat a large non-stick skillet over medium low heat. It should feel quite warm when you hold your hand just above the surface. Working in batches, carefully remove the muffins from the baking sheet, about 4 at a time, and transfer them into the heated pan. Do not crowd them. Leave at least 2 inches between each muffin. Cover with a lid and cook for about 6 to 7 minutes until golden brown on the underside. Having the lid on will create steam which will help the muffins to rise and cook thoroughly.
- Once the underside is golden brown, carefully flip over and toast on the other side.
- Set aside to let them cool slightly before eating. I like to split them in half using a fork, sticking it carefully into the centre of the muffins all the way around and gently pulling them apart. This gives you lots of craggy bits. Serve warm with butter and jam.
- Any leftovers can be stored in an airtight container for up to 4 days. Split and toast in a toaster or under the grill. You make also freeze the in an airtight container for up to 2 months.
Did you make this recipe?
Tag @marierayner5530 on instagram and hashtag it #EnglishKitchen
Created using The Recipes Generator
In fact these are so good that I think that I may have to make some again really soon. I highly recommend!
This content (written and photography) is the sole property of The English Kitchen. Any reposting or misuse is not permitted. If you are reading this elsewhere, please know that it is stolen content and you may report it to me at: mariealicejoan at aol dot com
Thanks for visiting! Do come again!!
If you like what you see here, why not consider signing up for my newsletter and/or subscribing/following me on Grow. You can also bookmark my recipes via the Grow platform. Check out the heart on the right hand side of the screen.
Although I am rationing flour and sugar, I did want to make us something sweet for a weekend treat. Usually at the weekend I like to have a dessert of some kind.
This Diner Style Lemon Pudding fits the bill perfectly.
Not only does it not use any flour, but it also uses a minimum of sugar. Plus I had a lemon which needed using up and I'll be darned if I waste anything now.
I cooked pasta today that was 10 years past its use-by date and it was perfectly fine, believe it or not, and yes that was very brave of me.
It smelt alright and I cooked a bit and it tasted fine, so I used it. And I lived to tell the tale.
This recipe comes from a cookery book I have had since 2007, enitled The American Diner Cookbook, by Elizabeth MdKeon and Linda Everett.
It was originally published in 1962 and is filled to overflowing with an abundance of tasty sounding recipes. There are no photos in the book, bar fascinating photos of old Diners.
Diners hold a special place in the heart of Americans, and the culinary history of America.
Known for their warmth and good simple food they are restaurants which have always beckoned and tempted diners and weary travellers alike with the promise of delicious home cooked food.
The type of food your mama would have cooked. Great food, excellent service and great prices. They are the backbone of the American culinary experience.
They are also very popular here in the UK, Many entrepreneurs have tried to mimic the warmth and style of the American Diner experience, but I have to say in my experience, most have fallen way short of the ideal.
For the most part their food has been over-priced and lacking in something.
You can dress up a restaurant with all the chrome and formica you want, but, without the heart and the warmth of the original, they will always be sadly lacking in that special Je ne sais quois.
Just my opinion and experience.
This is not a pudding in the sense of a British pudding, which tend to be deliciously stodgy desserts, all of which come under the heading of puddings . . . steamed, baked, pies, cakes, etc.
Over here all are classed as pudding, which is merely another name for dessert.
This is very much a pudding in the North American sense . . . in that it is a thick, creamy cold custard type of pudding. Comforting and delicious.
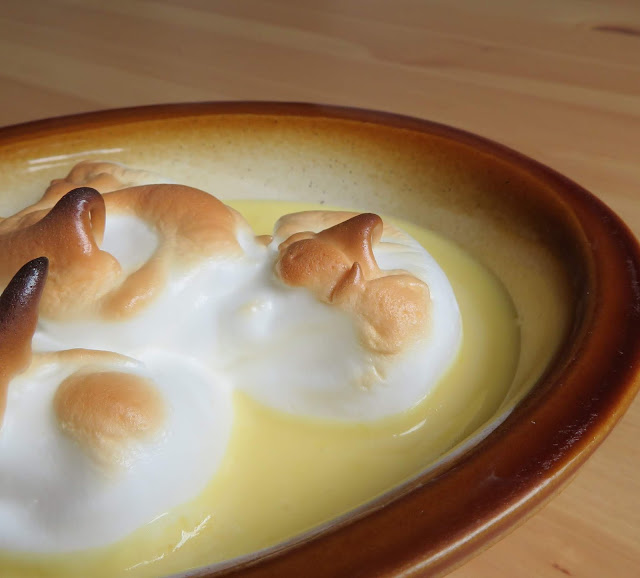
Rich and lush this pudding is filled with lemon flavour! Not too tart, but neither too sweet . . . just lemony enough without being over the top . . .
Creamy and lucious . . . rich with the addition of whipped cream, cream cheese and sour cream, but not a lot of any one thing . . . just a touch . . .
You begin by cooking a lemon custard, which . . . thickened and cooled, has whipped cream folded into it.
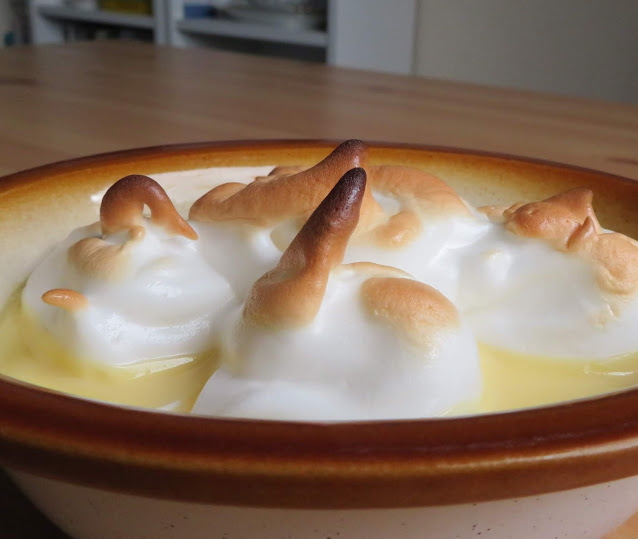
This is then poured into a casserole dish and topped with dollops of billowing sweet meringue . . .
Popped into a hot oven briefly until the meringue dollops are golden brown, but still remain soft.
This went down a real treat with the both of us, even my so-called lemon hating husband.
He actually really enjoyed it, so much so that he had two helpings. He just loves custard . . .
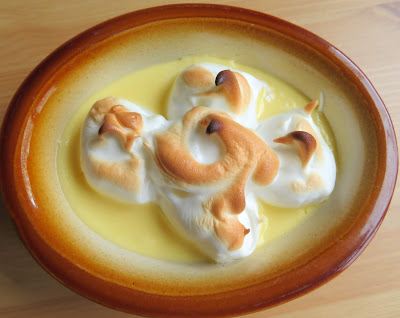
Diner Style Lemon Pudding
Yield: 6
Author: Marie Rayner
A delicious lemon pudding recipe which I adapted from a cookbook entitled American Diner. This is quite simply delicious.
Ingredients:
- 2 large free range eggs, separated
- 64g of caster sugar (1/3 cup finely granulated sugar)
- 3 ounces cream cheese
- 120g sour cream (1 cup)
- 120ml lemon juice (1/2 cup)
- 1 tsp finely grated lemon zest
- 120ml cream (1/2 cup)
- 1/4 tsp cream of tartar
- 2 TBS caster sugar
Instructions:
How to cook Diner Style Lemon Pudding
- You will need a double boiler for this, or a heatproof bowl that will sit comfortably over a saucepan of boiling water.
- Beat the egg yolks togeher with the sugar. Beat in the cream cheese and sour cream until smooth. Add the lemon juice and lemon zest, combining well. Pour into the top of the double boiler, or into the heatproof bowl.
- Cook, stirring constantly over simmering water, until the mixture becomes thick. Remove from the heat and cool completely.
- Preheat the oven to 220*C/425*F/ gas mark 7.
- Whip the cream until stiff. Fold into the cold lemon mixture and then pour the pudding into a shallow casserole dish.
- Beat the egg whites with the cream of tartar until foamy. Continue to beat while drizzling in the sugar. Beat until the egg whites become stiff and form peaks.
- Drop by tablespoons over top of the cold pudding. Pop the casserole into the oven for about 6 minutes until the meringue is golden brown. Cool completely before serving.
Did you make this recipe?
Tag @marierayner5530 on instagram and hashtag it #EnglishKitchen
Created using The Recipes Generator
This recipe also works very well, cut in half, which is what I did. It was my first time making this pudding. It was so delicious that I can promise you it won't be my last!
Subscribe to:
Posts (Atom)











Social Icons