This recipe I am showing you today is an old, old recipe which I have been making for my family for years and years.
Back in Canada, there aways used to be small cookery booklets for sale kept in racks right next to the cash register, mostly put out by companies such as Betty Crocker, Pillsbury, Bisquick, Kraft, etc.
This recipe comes from one of those, entitled, "Back to Homemade, by Betty Crocker.
It was published in October, 1991 and as you can see it is very well used. This book has travelled with me across Canada and back again and then across the Atlantic Ocean to England.
It is filled with lovely recipes and the unusual thing about it is that most of the recipes didn't require the use of convenience mixes. There are good basic recipes in this for everything from soup to nuts and everything in-between.
Good sound recipes, recipes that you could make your own, like this Chicken & Corn Chowder I am sharing with you today!
I wish I could tell you how many times I have made this delicious chowder. It is countless.
This was always one of my family's favourite dishes that I made for them. Its hearty, and filling, and very VERY tasty!
It uses simple ingredients like cut up chicken pieces water onions, celery and carrot . . . and the secret ingredient of a can of creamed corn.
My family always loved creamed corn.
I made it mine by adding some herbs . . . thyme, salt, pepper and sometimes summer savoury (but you could use marjoram) when I had it. Oh, but it is some good.
My children always loved the rivels . . . small tiny dumplings which were made simply by rubbing together an egg, flour and salt. This makes crumbs and you drop these crumbs into the hot soup.
They are done in literally minutes and cook up like little noodles. Children love them.
Todd has fallen in love with it as well. I do have to say one thing however, and that is you really want to make and eat it all on the same day if you are using the rivels.
They tend to swell up and make it a bit stodgy to leave overnight. If there are only a few of you, take out the amount that you want to save for another day and only add some rivels to what's left in the pot.
You won't need them all. This is also a great way to freeze portions for another time.
Just add as many rivels as you want and they are so easy to make and use such simple ingredients, it doesn't really matter if you don't use them all, and they are quite simple to make fresh each time you go to use them.
I use a large free range egg, but you could cut the ingredients in half and use a very small egg if you wanted to make less. In any case I just know you will love this as much as we do!
*Chicken and Corn Chowder*
Serves 8
Black pepper
1 sprig thyme
1 (418g/17oz) tin of creamed cornRemove the chicken from the broth. Cool for about 10 minutes or just until you can handle it. Remove the chicken from the bones,discarding any skin and bones Cut the chicken into bite sized bits. Skim any fat from the broth and discard. Return the chicken to the pot Stir in the corn and eggs. Taste and adjust seasoning as required. Heat to boiling and then reduce to a simmer.
Make the rivels by combining all of the rivel ingredients until the mixture resembles coarse bread crumbs. Drop into the simmering soup and cook, uncovered, for about 10 minutes. Serve hot.
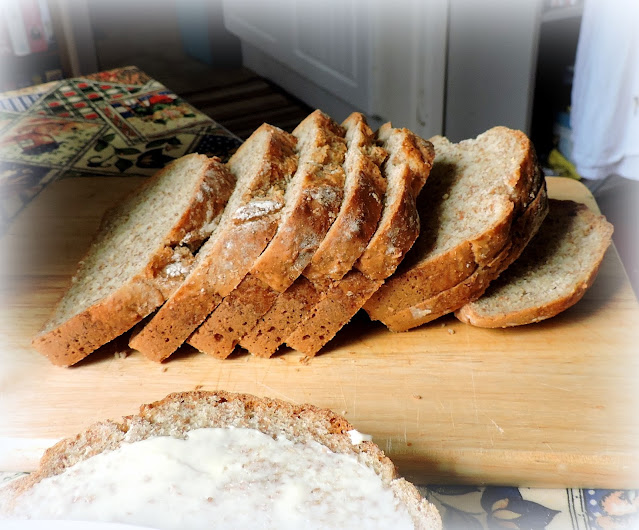
I served ours with some Irish Soda Bread. (My husband really likes bread with his soup!) You can find that recipe here.
Make somebody happy today and do make this delicious soup. You won't regret it and it is bound to become a family favourite in your home as well, or I'll eat my hat! You can't beat these old fashioned recipes for simple old fashioned goodness.
Note - I have never put the chopped hard cooked egg in ours. It was not something that my family enjoyed. Its perfectly delicious without it anyways!
This content (written and photography) is the sole property of The English Kitchen. Any reposting or misuse is not permitted. If you are reading this elsewhere, please know that it is stolen content and you may report it to me at: mariealicejoan at aol dot com Thanks so much for visiting. Do come again!
This is an old, old recipe gleaned from a Mennonite Community Cookery book many moons ago. Its such a simple dish and yet so delicious!
Proof positive that food doesn't have to be complicated to taste good. Everything simply gets layered in the crock pot and then cooked.
Long and slow until the meat is falling off the bone and the potatoes and green beans are tender . . .
Served spooned into bowls with some of the broth and crusty bread . . . it's simply fabulous.
Sometimes you can get really brave and throw in a jar or can of sauerkraut, you have drained and rinsed. That's good too.
It would not win any beauty contests, but I think beauty is oftimes largely over-rated, don't you?
You cannot beat this for taste and convenience. It leaves you hands free to get on with your day, knowing that something quite simpy tasty is bubbling away in wait for you at the end of it all.
Smoky ham, tender and delicious . . . the potatoes flavoured with ham stock, and the tender green beans . . . a slice of buttered crusty bread. Manna from heaven, this is . . . manna from heaven.
*Crock Pot Ham, Beans & Potatoes*
Serves 4
240ml water (1 cup)
3 large potatoes
freshly ground black pepper
Place the ham hocks into a slow cooker along with the water. Peel the
potatoes, cut in half lengthwise and then into half moons, about 1/2
inch thick.
Place the potatoes into the slow cooker on top of the ham
hock. Wash and trim the green beans. Lay them in the slow cooker on
top of the potatoes. Cover and cook on high for about 5 hours.
Remove
the ham hocks and shred the meat, discarding any bone or fat. Return to
the crock pot and mix all gently together. Pour into a serving dish,
sprinkle with some black pepper and serve immediately.
Those Mennonites sure know how to cook. I have never cooked one of their recipes but it wasn't lip smacking tasty at the end. You could serve this with mustard pickle or pickled beetroot, and a salad on the side (or coleslaw)for a complete meal. Bon Appetit!
I thought this weekend I would make our Christmas pudding for this Christmas and get it done and put away so that it is nicely ripened for the big day. Christmas puddings are a really big deal over here in the UK.
Back home we might have had a Carrot Pudding with Brown Sugar Sauce, but we didn't really do Christmas Puddings as such. The carrot pudding would usually have to be made on the day, although admittedly, my MIL used to make it and freeze it, and then just reheat it in the top of a double boiler.
Christmas Puddings are a very traditional thing here in the UK. Christmas (or Plum) Pudding is the traditional end to the British Christmas dinner. But what we think of as Christmas Pudding, is not what it was originally like!
Christmas pudding originated as a 14th century porridge called 'frumenty' that was made of beef and mutton with raisins, currants, prunes, wines and spices. This was quite liquidy, would need to be eaten with a spoon like a soup, and would have been a fasting meal during the preparations up to Christmas.
By 1595, frumenty was slowly changing into a plum pudding, having been
thickened with eggs, breadcrumbs, dried fruit and given more flavor with
the addition of beer and spirits. It became the customary Christmas
dessert around 1650, but in 1664 the Puritans banned it as a bad custom. (Those old Puritans were a bunch of party-poopers!)
In 1714, King George I re-established it as part of the Christmas meal,
having tasted and enjoyed Plum Pudding, and by Victorian times, Christmas
Puddings had changed into something very similar to the ones which are prepared and eaten
today.
The Plum pudding is a national symbol – It does not represent a class or
caste, but the bulk of the English nation. There is not a man, woman or
child raised above what the French would call proletaires that does not
expect a taste of plum pudding of some sort or another on Christmas
Day.
~London Illustrated News, 1850
Traditionally a Christmas Pudding is prepared on the last Sunday before Lent, which is lovingly referred to as "Stir Up Sunday." Stir-up-Sunday is usually a family affair.
Each family member is supposed to stir the mixture from East to West to honour the journey of the Magi. This ritual is also thought to bring the family luck and prosperity in the coming year.
At one time it was also customary to hide a number of small trinkets in the mixture, a bit like the twelfth night cake. These charms often included a silver coin (wealth), and a ring (future marriage).
Woe betide the guest who stumbled across a thimble in their serving. A future of Spinsterhood was a cert for them! Nowadays this generally isn't done, although Todd does remember his mom putting coins into theirs.
I am doing mine a bit earlier this year so that I can present you a tutorial on it and give you time to get in any necessary ingredients, etc. "Stir-up-Sunday" this year will be the 19th November.
125g dried figs, quartered (3/4 cup)
100g raisins (2/3 cup)
75g golden raisins (scant half cup)
75g dried currants (scant half cup)
50g glace cherries (1/3 cup)
65g candied ginger (scant half cup)
100 ml brandy (6 1/2 TBS)
125g butter, softened (1/2 cup)
140g soft light brown sugar (2/3 cup)
1 tsp freshly grated orange zest
1 large free range egg
25g blanched almonds chopped roughly (3 TBS)
25g toasted pecans, chopped roughly (3 TBS)
90g soft white bread crumbs (1 generous cup)
30g plain flour (1/4 cup)
15g self raising flour (1/8 cup)
1/2 tsp each ground mixed spice and ground cinnamon
pinch salt
Mix
all of the dried fruit together in a bowl. Add the brandy and stir,
mixing well together. Cover with a clean tea towel and leave on the
counter overnight to macerate.
The next day bruht a 1 litre
pudding basin (5 cup) well with melted butter and place a round of
baking paper in the bottom. Set aside.
Cream the butter,
sugar and orange zest together until light and fluffy in a large bowl.
Beat in the egg. Stir together both flours, nuts, spices and bread
crumbs. Add the macerated fruit and stir together to combine. Stir this
mixture into the creamed mixture combining well together. Spoon into
the prepared pudding basin, pressing it down to compact, smoothing the
top withthe back of a wooden spoon. Tap on the counter several times to
remove any air holes.
Place a large sheet of tinfoil on
the counter. Top it with an equal sized piece of baking paper. Butter
the paper. Make a pleat in the centre of both sheets together. Wrap
them over top of the pudding, leaving room for expansion. Secure
tightly with either a rubber band or kitchen string.
Place a
small heat proof trivet in the bottom of a large saucepan (with a tight
fitting lid). Lower the pudding into the saucepan, placing it on top of
the trivet. Fill the saucepan with enough boiling water to come 3/4 of
the way up the sides of the pudding bowl. Cover tightly and simmer over
low heat for 4 to 4 1/2 hours, topping up as necessary with boiling
water. Do NOT let it boil dry.
At the end of that time,
carefully fremove it from the saucepan. Leave to cool overnight. The
next day remove and discard the messy wrappings and rewrap in some clean
baking paper, foil and string. Store in a cool dark and dry place
until Christmas.
On Christmas Day, boil or oven steam (in
the container) for about an hour until heated through. Unwrap and turn
out onto a serving plate. Serve with your favourite sauces.
(You can serve it with Brandy Butter, Brown Sugar Sauce, Cream, Custard, etc.)
This was fun. I hope you will give it a go and make your own Christmas Pudding this year. It's really not that hard to do, and when you make your own, you know exactly what has gone into it! Bon Appetite!
I am doing mine a bit earlier this year so that I can present you a tutorial on it and give you time to get in any necessary ingredients, etc. "Stir-up-Sunday" this year will be the 19th November.
The fruit mixture of the pudding is a mix of dried figs, currants, raisins, golden raisins, cherries and candied ginger.
All are mixed together in a bowl the night before you go to make your pudding and a portion of brandy is poured over top and the fruit left to macerate in this overnight on the counter top.
A clean towel over top to keep it safe from dust and insects. If you don't like to use alcohol, you can use orange juice in an equivalent amount.
The next day softened butter is creamed together with soft light brown sugar, orange zest, ground cinnamon and ground mixed spice.
You can easily make your own mixed spice: Combine 1 TBS ground cinnamon,
1 tsp each of ground coriander and nutmeg, 1/2 tsp of ground ginger,
1/4 tsp each of ground cloves and all spice. Mix well and store in an
airtight container out of the light for up to 6 months.
An egg also gets beaten into this, a bit at a time so it doesn't curdle.
Fresh soft white bread crumbs are mixed with chopped blanched almonds and toasted pecan nuts.
Two kinds of flour are stirred into this mix of nuts, bread crumbs and spice. Plain flour and self raising flour.
You can make your own self raising flour by adding 1 1/2 tsp of baking powder and 1/4 tsp of salt to every cup of plain flour.
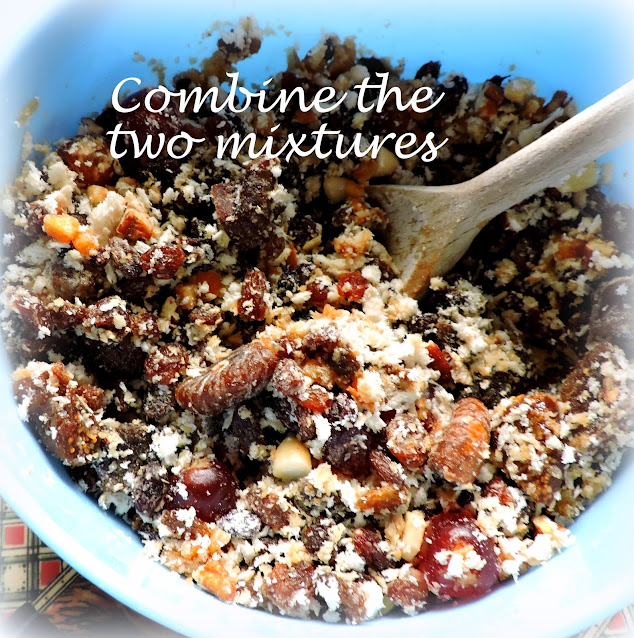
You then mix the macerated fruit together with the flour/nut/bread crumb/spice mixture.
This mixture then gets added and stirred into the creamed mixture to combine. Make sure everyone gives it a stir and makes a wish.
Don't forget East to West, just don't ask me which is which, lol! If you are putting trinkets in this is when you would do it.
I would wrap them in cling film first or waxed paper, and don't forget to warn any guests that they are there when it comes to eating!
The pudding basin is prepared by generously brushing it with melted butter and placing a round of baking paper in the bottom.
Pack the pudding mixture into the prepared pudding basin, smoothing the top out with the back of a wooden spoon.
Once you've done this tap the bottom of the basin on the countertop a few times to settle and work out any air holes.
This is the most complicated part of the pudding. Creating the lid to wrap it in. Lay a large piece of foil on the table, and top it with an equal sized piece of baking paper.
You then make a pleat in the paper, bearing in mind that the baking paper will be the side against the pudding. Butter the paper.
I fold them in half with the paper on the inside, and then, from about 2 inches down, I fold them back on themselves.
It should look like this on the paper side, and like the top picture from the foil side.
Wrap this over the top of your pudding basin, leaving plenty of room for expansion, paper side towards the pudding. Tie it tightly onto the bowl with some kitchen twine, bakers twine or even using a rubber band.
I use bakers twine and using a generous length, after I have knotted it, I fashion a handle with the excess that I bring back over the top and secure on the opposite side. This makes it easier to lift out of the pan when its done.
Trim off the excess paper and foil so it looks nice and neat.
You will need a large saucepan that is large enough to hold your pudding basin, with a tight fitting lid.
If you have a small trivet you can place it in the bottom of the pan, or you can do like me and fashion your own using a canning jar ring and some balls of foil.
The pudding basin gets set on top of this and boiling water gets poured down inside the saucepan just to come up 3/4 of the way of the sides of the pudding basin.
Tightly covered, the saucepan is then put on a low heat and the pudding simmers away for about 4 1/2 hours. Make sure you check it periodically and top it up with more boiling water as needed. You don't want it boiling dry.
At the end of that time, remove the pudding basin and let it cool on a rack overnight. Once it is cold you can remove the old wrappings and wrap it with clean new wrappings and then store it in a dark, cool and dry place until Christmas Day! Instructions for re-heating are in the recipe.
And there you have it . . . . Christmas Pudding!
*Christmas Pudding*
Serves 6 to 7
It
wouldn't be Christmas without one. I try to make mine in November so
that it is nice and matured by the time Christmas rolls around.
(You can serve it with Brandy Butter, Brown Sugar Sauce, Cream, Custard, etc.)
This was fun. I hope you will give it a go and make your own Christmas Pudding this year. It's really not that hard to do, and when you make your own, you know exactly what has gone into it! Bon Appetite!
When I was married before, I had a Sister in Law who was Jewish and lived in Toronto. She knew where to get the best Bagels. She would pick them up early Saturday morning, and bring back two huge paper bag's full from her local Jewish Baker, think it was called Gryfe's.
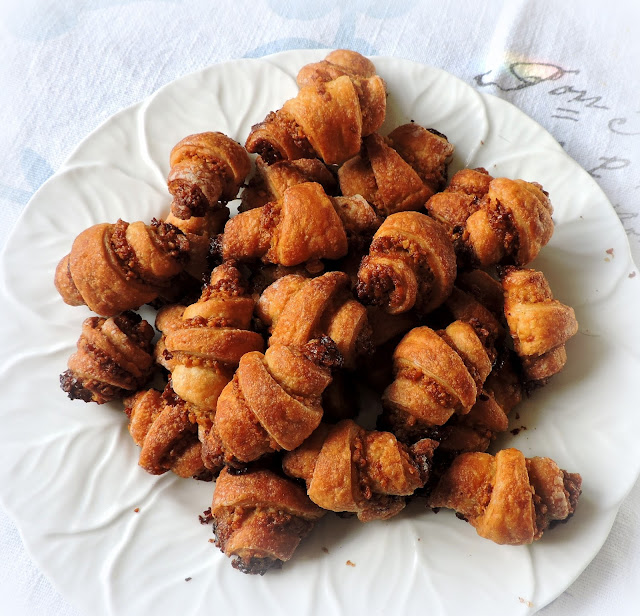
Oh boy but they were some good. We'd eat them fresh out of the bag, with cream cheese and lox. Hot coffees (when I drank coffee) and sometimes these tiny little delicate Rugelach Cookies, that were like little puffs of heavenly bliss. I am not sure if she got the Rugelach in the same place as the bagels.
I got to craving Rugelach earlier this week and decided to see if I could make my own. I went online (as you do) to find a good recipe for them, and I found a ton of recipes, basically all the same, so I thought if people are using this same recipe to make rugelach, then it must be a good rugelach.
I decided to go with the one I found on Kitchn, as the instructions were really good, it was kind of like a tutorial, but basically most of the recipes I saw were just like this.
They are not the cookie to make when you are in a hurry, for sure, but they are so worth the effort and mess of taking out the food processor.
The recipe does make quite a few, but that's not a problem because they are so good that you will inhale about a dozen right off the bat!
Its a basic dough composed of pretty much equal parts of cream cheese, flour and butter, an egg yolk and some vanilla.
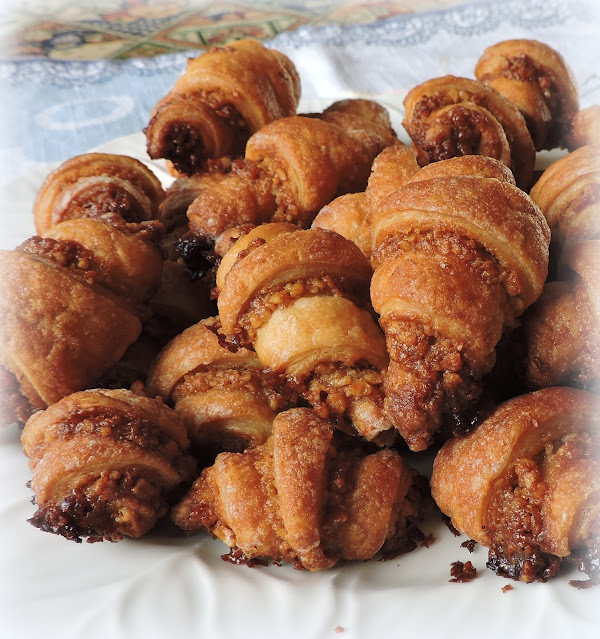
This is so flaky and rich when baked . . . like I said little puffs of heaven. The dough is chilled twice. . The first time as discs and the second time, rolled out, filled, cut and on baking sheets.
I went with a walnut and honey filling this time, which I flavoured lightly with vanilla, cinnamon and cardamom. But you can use chopped dried fruits also, or chocolate chips.
My sister in law used to get a mixture. All were very good.
Its also important to note that you don't have to make a full recipe if you don't want to.
You can cut the recipe in half and simply leave out the egg yolk. That is what I did, and they worked perfectly.
*Rugelach Cookies*
Makes 64
First make the cookie dough. Put the flour and
salt into the bowl of a food processor. Drop in the cream cheese and
the butter. Pulse until you get crumbs. Whisk together the vanilla and
egg yolk and add. Pulse until the dough just begins to clump together in
large bits.
Tip out onto a counter top which you have generously
dusted with icing sugar. Bring together into a ball and divide the ball
in half. Divide the halves in half and shape each quarter into a flat
disc about 1 inch in depth. Wrap in plastic cling film and chill for
about an hour.
Have ready several baking sheets which you have lined with baking parchment.
Spread
1/4 of the walnut mixture over top in a thin and even layer, right up to
the edges. Cut the circle into quarters and then cut each quarter into
quarters. They will look like pizza wedges, but of course a lot
smaller! Roll up from the wide edge of each triangle towards the tip.
Place onto one of the baking sheets, with the narrow tip underneath,
leaving some space in between each. Place the whole baking sheet into
the refrigerator for half an hour while you repeat these steps with a
second circle of dough.
Once
you have a second sheet filled with cookies, remove the chilling one
from the refrigerator and replace with the next sheet. Bake the
refrigerated sheet in the preheated oven for 18 to 20 minutes, working
on the remaining batches in the meantime. Mine took 20 minutes and
they were nice and golden brown and perfectly baked.
Store in a tightly covered container, in a cool place for up to 5 days. They can also be frozen. They also make excellent gifts.
Preheat the oven to 190*C/375*F/ gas mark 5.
Allow
the baked cookies to rest on the baking sheet for five minutes, then
transfer to a wire rack to finish cooling. Repeat with each subsequent
batch.
Store in a tightly covered container, in a cool place for up to 5 days. They can also be frozen. They also make excellent gifts.
These are excellent and really, not much trouble at all to make. They are not as quick as a mix and drop cookie, but they are worth every little bit of extra effort. Next time I am going to make the full recipe and fill them with some fruit and chocolate. These are so delicious I can tell you that it won't be very long before I will be baking them again!
Some other cookies you might enjoy are:
ALMOND HORNS - Beautiful almond flavored crescent cookies, rolled in flaked almonds prior to baking and then generously dusted with icing sugar.
CRANBERRY, GINGER & PISTACHIO SHORTBREADS - Crisp, glazed and filled with loads of dried cranberries, candied ginger and nutty pistachios!
Bon Appetit!
Subscribe to:
Posts (Atom)











Social Icons