Sunday, 30 June 2019

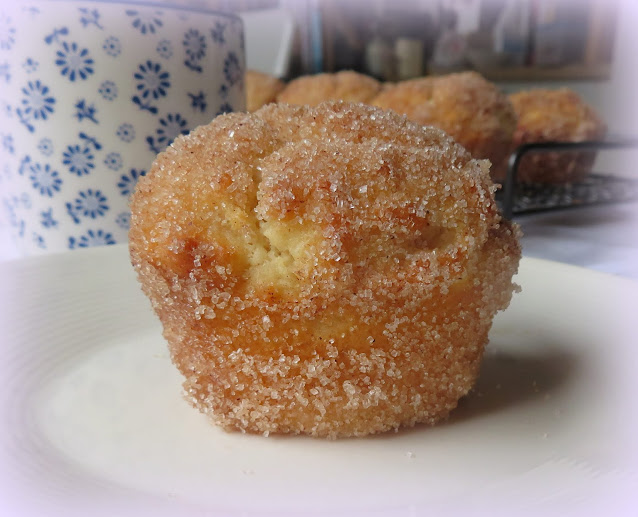
Sugar Jam Muffins


Here in the UK as I write this, we are enjoying one of the nicest days so far this summer.  The sun is shining and the skies are blue, well kind of hazy actually.  

Its one of the lazy hazy days of summer!  


I was up especially early this morning as we had a Missionary Correlation meeting to go to at 9:30.   I baked some special muffins to take  . . .  Sugar Jam Muffins  . . .  

We ended up not going because it had ended up that Todd had a bad night last night, one of those night where he had not slept a wink (according to him) but in any case he felt pretty blah. So I told him to go back to bed.  


The recipe itself is an old handwritten recipe  . . .  the kind that you write down  . . .  shared from a loved one or friend.  With really brief instructions.  

Sometimes only the temperature and cook time.  These are the best kind of recipes.  The tried and trues, but with such a brevity of instruction, you do have to have somewhat of a natural feel for cooking! 


These are a really fabulous muffin . . .  with a tender buttery crumb . . .  its pretty basic.  Just butter, sugar, egg, baking powder, flour, milk  . . . 

Sugar Jam Muffins  

Most times when you make a muffin, you just whisk together the dry ingredients, and add the wet.  These go together in slightly different manner . . .  


You cream together the sugar and butter and then beat in the egg.  Once that is done, then you fold in the flour/baking powder, alternating with some milk. 

Sugar Jam Muffins  

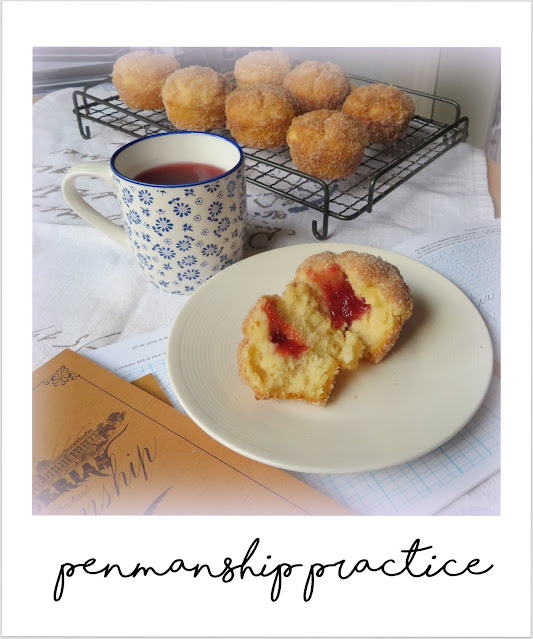
Half the batter gets put into a well buttered muffin tin, topped with a dab of jam . . . I like strawberry . . . and then the remaining muffin batter gets spooned on top . . . before baking in a hot oven. 


Once they are baked, all puffed and golden brown, you roll them in melted butter and then cinnamon sugar.  

You don't want to do this as soon as you take them out, they are a bit too fragile for that right then . . .  wait about 10 minutes or so . . . 

Sugar Jam Muffins  

Just long enough to sit and stare out the window at the fine day that is coming to life and happening right on your doorstep . . . 


I love my glass birds.  I got them here, from Simon Alderson, on Etsy. On  sunny warm day, they glow with light.  He does about 8 different once.  I have four.  I had been looking for a sparrow a while back, to remind me that "His eye is on the sparrow and I know He watches me." I bought one of his sparrows.  

Then I bought one for my mom for Christmas last year, and one for me at the same time, so we could share the joy.  Mom's went with her . . .  that brought me comfort to know that a piece of my love for her will always be in her hands.  Since then I have bought a couple more as and when I can afford them.  They're really pretty. 

 Sugar Jam Muffins  

Almost as pretty as these delicious muffins!  


 I sat in my chair by the window while Todd slept, enjoying a hot cup of fruit tea and one of these fabulous muffins while I practiced my penmanship . . .

 Sugar Jam Muffins 

My handwriting has deteriorated so much over the last 30 years or so since I first  wrote out the recipes in my folder  . . .  I hardly write at all these days. 

Its mostly typewriting.  I started practising my penmanship a while back so that I could get back the skill.  If you don't use it you lose it.  


Yield: 8
Author: Marie Rayner

Sugar Jam Muffins

Buttery tender muffins, filled with jam and coated in cinnamon sugar.  Scrumptiously tasty!

ingredients:

  • 100g granulated sugar (1/2 cup)
  • 120g butter, softened (1/2 cup)
  • 1 large free range egg, lightly beaten
  • 120ml milk (1/2 cup)
  • 210g plain flour (1 1/2 cups)
  • 1 1/2 tsp baking powder
  • strawberry jam or your preferred jam to fill
To coat the muffins:
  • 150g granulated sugar (3/4 cup)
  • 2 tsp ground cinnamon
  • 120g butter, melted

instructions:

How to cook Sugar Jam Muffins

  1. Preheat the oven to 200*C/400*F/ gas mark 6.  Butter 8 large muffin cups really well.  Set aside.
  2. Cream together the butter and sugar until light and fluffy. Beat in the egg.  Sift together the flour and baking powder.  Add to the creamed mixture alternately with the milk, making 3 dry and 2 wet additions.  Spoon half of the batter into the muffin tin.  Dab about 1 tsp of jam into the centre of each, avoiding the sides of the tin.  Cover with the remaining batter.
  3. Bake in the preheated oven for 15 to 18 minutes.  Let sit in the tin for about 5 to 10 minutes before tipping out.
  4. Whisk the sugar and cinnamon together in a bowl.  The original recipe only called for 1/2 tsp cinnamon, but we like more.  Place the melted butter in another bowl.  Gently roll the baked muffins (still warm) in the melted butter and then in the cinnamon sugar to coat.  Set aside on a wire rack to dry.  Enjoy with a nice hot cuppa!
Created using The Recipes Generator 


This content (written and photography) is the sole property of The English Kitchen. Any reposting or misuse is not permitted. If you are reading this elsewhere, please know that it is stolen content and you may report it to me at: mariealicejoan at aol dot com Thanks so much for visiting. Do come again! 

Follow my blog with Bloglovin


Saturday, 29 June 2019

Red, White & Blue Baked Alaska


Have you ever had one of those days, weeks, months, years?  This year is turning into one set back after another!  As you know my mother passed away in January, very suddenly. 


 That was really hard on all of us.  Just the worst.  We all know we are going to lose our loved ones one day, but somehow, when it happens, we are never prepared for it.


Then my oven broke, not once, but twice  . . .  and I was without a working oven for about 2 1/2 months altogether.  After that somehow, its still a mystery to me, my stick blender disappeared. Not the whole thing, just the motor for it.  


And now today my electric mixer has blown up.  Right in the middle of making these  lovely desserts.  I apologise in advance for the crummy photos.  They are not as pretty as they might have been had I not had to beat up the egg whites by hand.


I had no sooner got everything ready to go, went to plug in my electric mixer and there was a loud bang.  Let me tell you I just about hit the ceiling! 


 Shocking to say the least! I near jumped out of my skin!  Its a wonder I didn't drop something.


And in the meantime ice cream was starting to melt  . . .  I quickly threw them back into the freezer and then began beating furiously with my hand whisk. 


It takes forever to whisk egg white stiff with a hand whisk.  I don't know how our grandmothers did it.  They must have been made from much sturdier stuff and had stronger arms.


We are so very spoilt!  We truly are!  Anyways I finally got it all stiffed up and went to spread it on my frozen cakes. 


It was deflating as fast as I was spreading it.  Blah . . .  there is no comparison to electric whisked whites  . . .  but I did my best!


The end result was no less tasty, but not quite as pretty as I had envisioned. 


I wanted to share them anyways, because this is a really solid recipe and with all your stars aligned will absolutely turn out beautifully!  Its easy and quick and very delicious!


You can make as many or as few as you like!  I made two, but you could make ten or even twenty if so inclined. Simple.


They work best if you cut the cake, cover it with the jam and ice cream and berries and freeze the night before. That way they are really cold when you go to spread the meringue over top and pop them into the oven. 

 If they are really cold when you go to bake them the ice cream won't melt in the oven.  It will still taste good if the ice cream does melt a bit, but trust me when I say they won't be as pretty!

Yield: variable
Author: Marie Rayner

Red, White & Blue Baked Alaska

You can make as many or as few of these as you like.  I will give the quantities for two, but you can multiply them to make more. Quick, easy and delicious. You can cut out and top the cakes before hand, keeping them in the freezer until you need them, covering with meringue at the last minute prior to baking.

ingredients:

  • 2 slices of pound type of cake (Madeira cake) 1/2 inch thick
  • 2 tsp good quality strawberry preserves
  • 2 scoops of vanilla ice cream, or strawberry/raspberry ripple
  • sliced strawberries
  • Mixed berries to serve
For the Meringue:
  • 3 large free range egg whites
  • 2 1/2 TBS caster sugar

instructions:

How to cook Red, White & Blue Baked Alaska

  1. These preparations can be made the night before and then put into the freezer.  Take your slices of cake and using a 2 1/2 inch round cutter, cut out two round circles from the cake.  Line a small baking sheet with parchment paper.  Lay the cake slices, well apart on the lined baking sheet. Spread each with a teaspoon of strawberry preserves.  Top with a scoop of ice cream and surround each scoop of ice cream with slices of strawberry around the bottom edge.  Put in the freezer to get really cold. (You can do this the night before.)
  2. When you are ready to bake your desserts, preheat the oven to 220*C/425*F/ gas mark 7. 
  3. Break your egg whites into a clean glass bowl.  Whip with an electric whisk until they start to get foamy.  Continue to beat, adding the sugar slowly until the egg whites are stiff and glossy.
  4. Remove your cakes from the freezer and working quickly with a small flat flexible spatula cover the cakes  with the meringue, swirling it decoratively, and covering the top and sides completely. 
  5. Pop the oven tray into the preheated oven for 8 to 10 minutes until light golden brown.  Carefully remove from the baking tray with a large metal  spatula and pop onto serving dishes.  Serve immediately with an assortment of fresh berries on the side.
Created using The Recipes Generator


I have no idea how long I will have to wait until I can get a new mixer.  It will probably be months, but in the meantime I reckon I am going to develop some seriously arm muscles.  Every cloud has a silver lining!  


Friday, 28 June 2019

The Perfect Picnic


 This week in honor of the world's first Pickle-nic Week we decided to invite some good pickle-loving friends over  for a picnic lunch to help celebrate with us. 


A Pickle-nic shared is a Pickle-nic joy doubled!  That's my story and I'm sticking to it!


Pickles are the perfect picnic food don't you think?  Sweet/sour/crunchy and perfectly portable!  


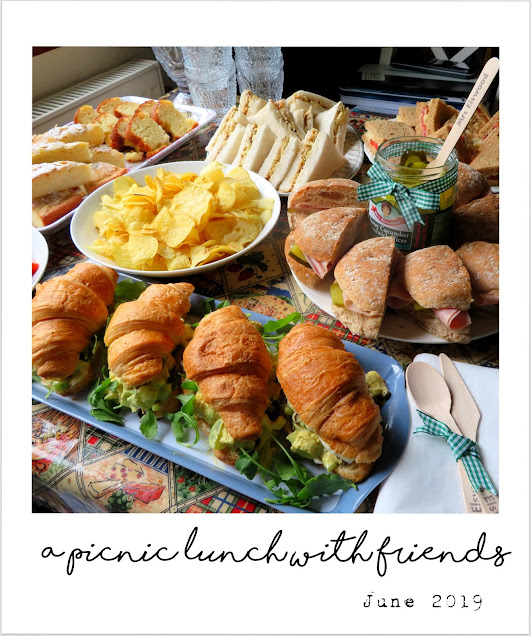
Of course our weather these past few weeks hasn't been all that Picnic friendly, so for safety we planned a Pickle-nic worth indoor picnic and of course Mrs Elswood's pickles were the centre of our picnic table feast. 


They are the only pickle I have ever been able to find over here in the UK that compares in taste and crunch to the pickles I was used to from back home.  I miss the pickles from home and its so nice to finally have a tasty alternative here that I can munch on and enjoy just as much!


Their sandwich slices were perfect in my ham and pickle buns.  Such a simple make also, with plenty of salty ham, sweet pickle crunch and some sharp grainy mustard.  


Simply layer well buttered soft rolls that you have spread with grainy mustard (I used German) with some  Mrs Elswood's Sandwich slices and some finely sliced ham.  Perfectly delicious!  These went down a real treat! 


This was a picnic I decided to throw together basically at the last minute, having only decided to plan it on Monday evening.  I had been wanting to have our friends over for a while but had been waiting for good weather to do so in. 


I finally told myself "The heck with the weather!" we will just invite them anyways and weather come what may, we'll either do it indoors or outside.  I planned something which worked both ways. 


My Perfect Picnic List 


- Suitable seating, blankets and folding chairs for outdoors, or plenty of seating indoors 
- A cooler or basket to hold the food whilst transporting (outdoor picnics) or a suitable surface to spread everything out on (indoors)
- Freshly made sandwiches, suitably wrapped. Nothing overly messy. If your sandwiches are going to be in the car or basket for too long, make sure you also include little ice blocks to keep everything cold, or else avoid fillings which include mayonnaise. Indoors, make your sandwiches ahead of time, and keep them covered and chilled in the refrigerator, putting them out just before serving.
- Something crunchy to enjoy along with your sandwiches. Crisp pickles. Crisp raw vegetables (with dip!). Potato chips. 
- Something sweet to satisfy everyone's sweet tooth.  Sturdy cakes that travel well and are not overly fussy with tons of frosting and decorations. Fresh fruit/berries. Cookies and squares, again not too fussy or mussy. 
- Plenty of cold refreshing drinks. Carbonated don't travel well. I like to make ice cold lemonade and then pack it into large sealable containers with plenty of ice. Of course if you are indoors transportation isn't a problem, neither is keeping everything cool until you are ready to enjoy.
- paper napkins, plates, plastic/wooden knives/forks/spoons, cups
- scintillating conversation and company, plus some calming background music, nothing to gregarious or distracting. Gentle and soothing is the key. 


MAKE SURE YOU INVITE EVERYONE TO LEAVE THEIR MOBILES/LAPTOPS AND OTHER DISTRACTING MEDIA ASIDE FOR THESE FEW HOURS!  This will greatly add to the enjoyment of the time you are able to spend together!


Aside from the Ham & Pickle Buns I made a few other sandwiches.  I did Cheese & Tomato on whole grain bread (Just layer in grated strong cheddar cheese, and sliced ripe tomatoes, making sure you drain as much of the pips out beforehand), Cheese & Pickle (exactly what it says and very popular) and some Chicken Salad Croissants.  


I made a delicious Curried Chicken Salad and then layered it in fresh buttered croissants along with some baby rocket. 


Curried Chicken Salad

Yield: Makes about 3 cups
Author: Marie Rayner
A delicious chicken salad that you can either enjoy on its own spooned over lettuce or in a tasty sandwich!

ingredients:

  • 110g good quality full fat mayonnaise (1/2 cup)
  • 120g full fat Greek yogurt (1/2 cup)
  • 1 heaped TBS mango chutney
  • 1 tsp fresh lime juice
  • 3 to 4 tsp curry powder
  • salt and black pepper to taste
  • 250g cooked chicken, cubed or shredded (2 cups)
  • 2 spring onions, trimmed and finely sliced
  • 4 TBS flaked toasted almonds
  • 12 grapes quartered
  • 1 stalk of fresh celery,  chopped
  • 3 TBS raisins

instructions:

How to cook Curried Chicken Salad

  1. In a bowl whisk together the yogurt, mayonnaise, lime juice, chutney, curry powder and seasoning until smooth.  Fold in the remaining ingredients, stirring well to combine.  Taste and adjust seasoning as required.  Store in a covered container in the refrigerator. This will keep in the refrigerator for about 2- 3 days. I would not keep it any longer. (Of course this depends on when you cooked the chicken. I never keep cooked chicken any longer than 4 days in the refrigerator.)
Created using The Recipes Generator


The chicken croissants went down a real treat along with the ham and pickle sandwiches, although the chicken croissants were a tad bit messy, but in a very good way if you know what I mean!  


For the something crunchy I provided some potato chips.  You could use ruffled chips or tortilla chips and have a dip as well if you wanted. 


Of course plenty of crunchy pickles are nice and yes, the vegetables and dips!  Did you know you can stuff larger pickles with cheese?  Just do a search on google.  


I found some that had been wrapped in bacon and fried.  OH MY GOODNESS.  Not exactly Pickle-nic worthy, but hey ho!


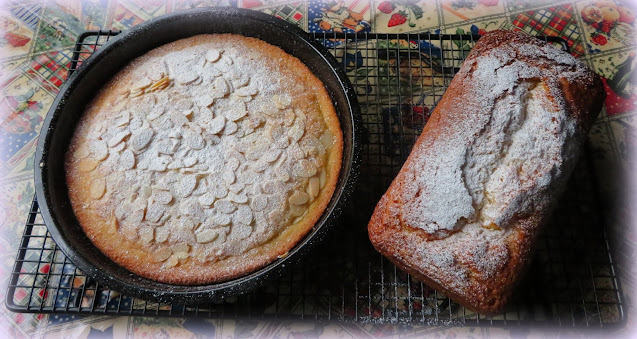
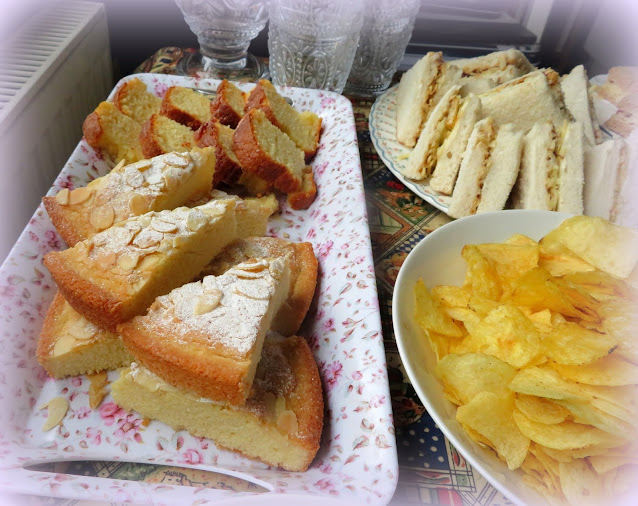
For my something sweet I served  fresh berries from the garden and cake.  I had baked two cakes for the occasion . . . 


Swedish Visiting Cake 


Swedish Visiting Cake on the left and French Yogurt Cake on the right.  


We enjoyed them with the berries and I'll be honest with you because we were at home I got some Clotted Cream Ice Cream out of the freezer and we each had a scoop of that on top as well! 


And of course we washed it all down with an assortment of refreshing drinks.  I had ice cold sparkling water which I served with a twist of lemon over ice and chilled sparkling lemonade.  Both were nice and went very well.


Everyone loves these Ham & Pickle Sandwiches.  Mrs Elswood's Sweet Cucumber Sandwich slices worked perfectly in these and we even enjoyed a few on their own, because who doesn't enjoy the extra crunch of a pickle, sliced or not! 


These taste very similar to the Bread & Butter Pickles from back home. Great on burgers, hot dogs, sandwiches and even chopped up and popped into your salads. 


I wish they would do a sweet pickle relish like we have back home. So, so, so tasty! 


This was a wonderful feast to be enjoyed for Pickle-nic week.  Everyone was really happy with the food.  


It wasn't stressful for me to prepare and made for a very relaxing meal. Picnics indoors or out! You can't beat them for fun, fun, fun!  


picnic memories


A PICNIC MEMORY

I must have been 10 or 11 years old and my friend and I decided we wanted to go on a picnic.  My mom made me a peanut butter sandwich and I had that in a brown paper bag along with a few cookies.  I also had a cold bottle of Nesbitts Orange Soda Pop.  My friend had something similar.  


We popped our lunches into our bicycle baskets and then took off for the great outdoors on a grand adventure.  We ended up in Torbrook, which was quite a tough bicycle ride partway up the nearby South mountain.  


We parked our bicycles and ate our lunches on a hillside looking down on the old Baptist church, with the sounds of bees buzzing, all hot and sweaty from our exertion in getting there, but I can tell you, you have never tasted a better or more delicious peanut butter sandwich than that one!  

We finished it off by eating some green apples we picked from a near-by tree and went to bed with belly-aches that night, but oh what a wonderful memory we had built!  

I do believe a Picnic is a wonderful excuse to crack open your inner-child and dust it off for a few hours!!!

Happy Picnic Days!!


Thursday, 27 June 2019

Swedish Visiting Cake


We were having guests for lunch on Tuesday.  I kept it simple this time. Just sandwiches, potato chips, pickles and cake. 
 
 You can never go wrong with cake!


I baked a Swedish Visiting Cake and a French Yogurt Cake because if you can't go wrong with one cake, you REALLY can't go wrong with two cakes.
 
And to be honest I was a bit ashamed that it was only sandwiches, so I thought two cakes would make up for the lack of anything else!


The French Yogurt Cake is a recipe I have shared before.  Its a really simple cake.  Really simple.  This time I baked it in a loaf tin, and it took approximately 35 minutes to be done.  
 
Its a no fail cake.  When you are having company for lunch, you want something which is no fail . . .  there is no time for do-overs.


This Swedish Visiting Cake is also pretty much a no fail cake. 
 
 Its quite simple to make and very easy to throw together at the last minute!


Because of the name, I am assuming it is Swedish in origin.  Duh!


It is the kind of cake that would be perfectly comfortable sitting on the tea table, meant to be shared between friends and a nice hot cup of tea.  (Herbal in my case.) 


It is dense and buttery with a moist crumb. 
 
Don't worry, I have not left the baking powder or soda out.  There is none in the recipe.  None at all. 


Its not that kind of cake.  It is a humble cake.  A simple cake.  A delicious cake. 


Flavoured with lemon zest which I like to rub into the sugar.  This helps release the oils and give the cake even more lemon flavour.  A little trick I learnt from Dorie Greenspan way back when. 


There is also vanilla and almond flavouring in the batter.  I always use a good vanilla, pure vanilla.  
 
Don't you just love the smell of almond extract?  Or is it just me? 


The batter goes together quickly and simply, which is one of this cakes assets.  
 
You can easily throw it together at the last minute and it will be out of the oven in about half an hour.  Just long enough to take your friend's coat and hang it up and get them all settled in.


You scatter flaked almonds over the top prior to baking, which gives it a nice crunch.


I like to dust the top with icing sugar to serve.  
 
Its a bit like popping a frilly crinoline under a skirt . . .  it just prettifies everything up.


I dare say it also goes very nicely with fresh berries . . .  and this is berry season after all!

Yield: Makes one 9-inch round cake
Author: Marie Rayner

Swedish Visiting Cake

A simple cake that is meant to be enjoyed with a friend and a hot cuppa. There is no leavening in this cake, don't worry I haven't omitted it.

ingredients:

  • 190g caster sugar (1 cup)
  • the finely grated zest of 1 lemon
  • 2 large free range eggs
  • 1/4 teaspoon salt
  • 1 teaspoon pure vanilla extract
  • 1/2 teaspoon pure almond extract
  • 140g cup plain flour (1 cup)
  • 115g unsalted butter, melted and cooled (1/2 cup)
  • a handful of flaked almonds
  • icing sugar to dust

instructions:

How to cook Swedish Visiting Cake

  1. Preheat the oven to 180*C/350*F/ gas mark 4. Butter a 9 inch round cake tin really well and dust lightly with some flour. Set aside.
  2. Measure the sugar into a bowl. Rub in the lemon zest until quite fragrant. This helps to release the natural oils of the lemon and adds even more lemon flavour. Beat in the eggs, one at a time. Stir in the salt, vanilla and almond to mix. Stir in the flour. Fold in the melted butter until thoroughly combined. Pour the batter into the prepared cake tin, smoothing it out. Sprinkle flaked almonds over the top to lightly cover.
  3. Bake in the preheated oven for 25 to 30 minutes, until golden and crisp around the edges. It should still be moist in the centre. Remove from the oven and let sit on a wire rack for about 10 minutes before running a knife around the edges and carefully removing it from the pan to cool completely. Dust with icing sugar to serve.
Created using The Recipes Generator


Of course I had to try a slice after baking, just to make sure it had turned out properly as it should.  No worries.   Everyone knows that when they get cake in this house, there is always a slice missing! 😉 


This content (written and photography) is the sole property of The English Kitchen. Any reposting or misuse is not permitted. If you are reading this elsewhere, please know that it is stolen content and you may report it to me at: mariealicejoan at aol dot com Thanks so much for visiting. Do come again! 


Follow my blog with Bloglovin